• This community needs YOUR help today. We rely 100% on Supporting Memberships to fund our efforts. With the ever increasing fees of everything, we need help. We need more Supporting Members, today. Please invest back into this community. I will ship a few decals too in addition to all the account perks you get.


    Sign up here: https://www.muzzleloadingforum.com/account/upgrades
  • Friends, our 2nd Amendment rights are always under attack and the NRA has been a constant for decades in helping fight that fight.

    We have partnered with the NRA to offer you a discount on membership and Muzzleloading Forum gets a small percentage too of each membership, so you are supporting both the NRA and us.

    Use this link to sign up please; https://membership.nra.org/recruiters/join/XR045103

Trigger on new Deerstalker

Muzzleloading Forum

Help Support Muzzleloading Forum:

This site may earn a commission from merchant affiliate links, including eBay, Amazon, and others.
Joined
Nov 1, 2022
Messages
12
Reaction score
17
Location
Western Montana
Howdy,

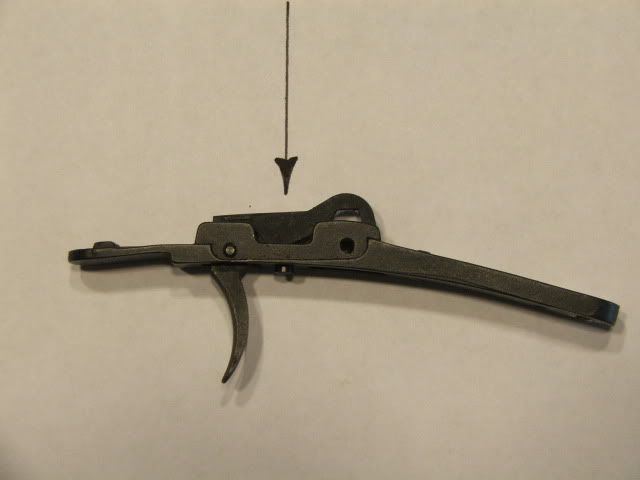
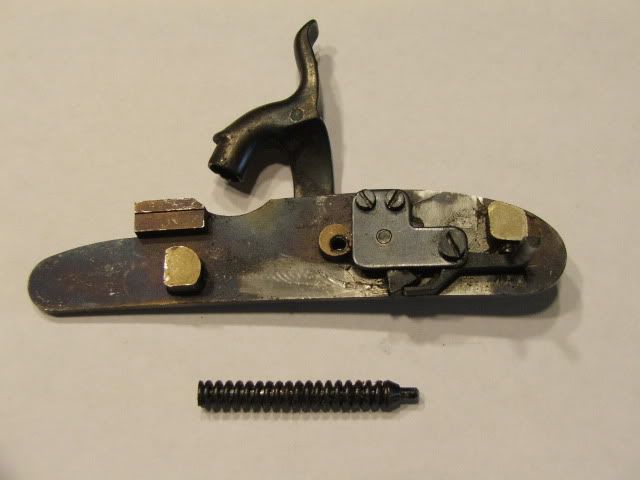
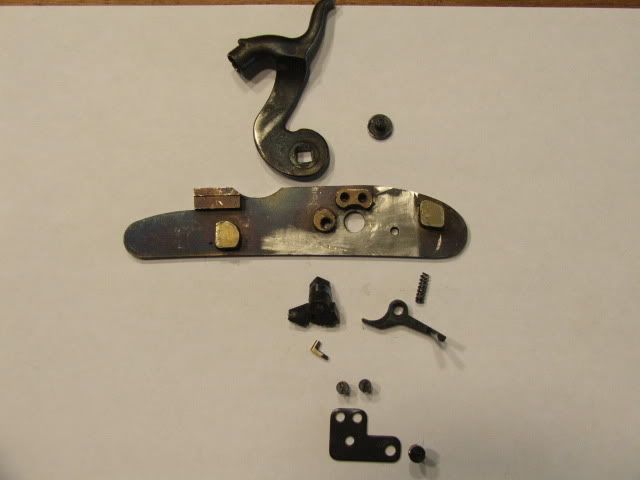
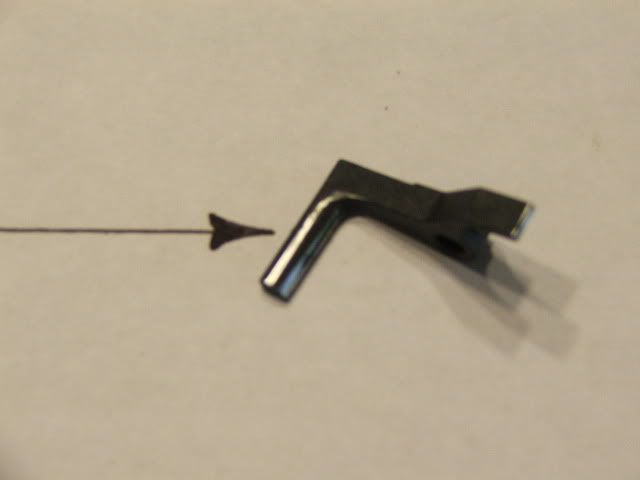
I recently bought a brand new Lyman Deerstalker percussion in a .50 and would like to know others' experiences with the lock and trigger. My conservitive estimate would be that it breaks at well over 6 lbs. Cocking the gun revealed some rougness when the hammer is cocked back from half to full. I took out the lock and looking at it I can see that a square edge of the fly dragging on the sear is causing the rough operation while the hamer is travelling back past halfcock. It doesn't make much difference when cocking silently with the trigger depressed as in a hunting situation, otherwise it is gritty. As for the heavy trigger, I've found that on occasion I can squeeze it about 1/32" and stop before it breaks. I don't mind a little travel before the break, but would like to smoothen and reduce the pull to between 3 or 4 lbs. Was wondering whether polishing the contact surface on the tumbler, especially around the full-cock notch would improve trigger pull. Anyone have relevant experience in this regard with the Deerstalker or Trade rifle?

Thanks,

MS
 
A better solution would be to cock and release the hammer, stopping the full travel before it strikes the nipple. Do this 50 to 60 times. This will "self hone" the contact edges removing some roughness and burrs. Remove the lock and lube all contact points and see if that helps. Also cycling the leaf spring helps take some of the initial tension off.

Honing any of those internals has inherent dangers.
 
Last edited:
If you have a proper set of honing stones you shouldn’t have any problems disassembling and polishing all your lock and trigger parts. The key is the polish and remove burrs. Not to alter contact points. Whether it’s a Chambers lock or a Traditions lock, they all work better after polishing or tuning if you want to call it that.
 
you shouldn’t have any problems disassembling and polishing all your lock and trigger parts. The key is the polish and remove burrs. Not to alter contact points.
Exactly what @TDM said. And lubrication,, get all that heavy factory packing grease off everything and just use light gun oil.
(you can take that spring and shaft out with a needle nose)
Don't forget it's a gun using gun oil, the stuff needs to be cleaned and refreshed from time to time,
Gun care is not a "once and done" gig, right?
But a little smooth stone and polishing, with a drop of oil goes a long way with these things.
 
Last edited:
Cycling the hammer as mentioned above will polish the parts without disassembling the lock or damaging the part to be stoned. Clean the lock first and oil it after cycling the hammer for a spell. It's easy to do while watching TV. That's what I did with my DeerHunter .50 and it worked like a charm.
 
Cycling the hammer as mentioned above will polish the parts without disassembling the lock or damaging the part to be stoned. Clean the lock first and oil it after cycling the hammer for a spell. It's easy to do while watching TV. That's what I did with my DeerHunter .50 and it worked like a charm.
Exactly. No risk of overhoning, ruining the edge on the sear, or screwing something up during assembly/disassembly. ALWAYS use the least invasive, less risk potential methods first to achieve your desired result. Cycling the hammer will get you what you want most of the time.
 
Thank you for the replies everyone!
I cocked and dry-fired with a folded towel on top of the nipple over a hundred times without any perceptable change. Then I found this post and followed the directions:
Before I post this I'd like to add a disclaimer:
I am not a gunsmith. Before building/assembling my 2 'Frankenrifles' I had never attempted anything like this before. I have had no instruction on how to do this & if anyone sees anything I've done that would be considered unsafe, anything that could be done better or anything that I didn't do that I should; please, please chime in so that I & others will know better for next time!
Thanks

Okay, that out of the way, let's begin:

First, remove your lock & trigger.


The trigger I'll show is a standard Lyman/Investarms double set unit, with the set trigger mechanism removed.

Smoothly polish the contact area of the trigger bar (I use very fine EDM stones, but 800 grit wet & dry paper works just as well)
lockbits001.jpg


Strip the lock. You'll need to compress the mainspring to remove it & the guide from the tumbler. You'll also need to be carefull when you remove the lower of the 3 screws in the bridle. It holds the sear in place & the sear is under sprung tension.
lockbits002.jpg

lockbits003.jpg


Once fully disassembled, & all the screws, springs & fly have been put in something the cat can't get into (the bastard.....) you can start to polish the sear.
First, polish the trigger contact area (I don't know if this has a special name. If it does, polish that bit)
lockbits005.jpg


Next polish the tip of the sear. You can round off the edge lightly. Not enough that it won't catch in the full-cock-notch, just enough that it rides smoothly over the edge.
lockbits004.jpg

lockbits006.jpg


There are 4 specific areas of the tumbler that need looking at.
1)The flat contact surfaces that sit against the bridle & lockplate,
2)The full cock notch tip,
3)The full cock notch flat &
4)The pivot that protrudes the lock plate. Again, please forgive my terminology, I don't necessarily know what every little bit is called.
1)
lockbits011.jpg

2)
lockbits007.jpg

3)
lockbits008.jpg

4)
lockbits013.jpg


If you look at the full-cock-notch, you'll see that it is 'hooked' so that the tip of the sear sits firmly in place. The trouble is that when you pull the trigger to release the sear, you are actually trying to rotate the tumbler backwards so that the sear-tip can pass this hook. I removed just enough metal from the hook so that it was flat surface. I left it so that the angle of the notch is such that the sear can't slip over the edge, even with repeated 'test whacks on the table edge' but it doesn't have to move the tumbler to disengage.

Also, it couldn't hurt to polish the pivot area of the screw that holds the sear.....
lockbits014.jpg


Finally, polish the back of the lockplate where everything sits, slides, turns & touches.
You can see some pretty nasty gouges in the back of mine that I didn't need to polish out after doing everything else....
lockbits012.jpg


I have also removed 1½ coils from my sear spring, but had I known then what I know now, I would've left this until I had done everything else & tested the lock. It was the first thing I tried, simply because I figured it would be the easy option.
By itself it dropped 1# off the trigger pull weight.
Judicious polishing & 'tuning' of the lock dropped 3# which would've given me exactly what I wanted. As it is, my trigger pull is now 2# & this being a hunting gun, I would've preferred a little heavier.

When I reassemble the lock, I use a tiny, tiny amount of lithium grease. Barely enough to be visible, but enough to prevent any metal-metal contact. Maybe I just got lucky, but by looking at what touched or rubbed against what & making those areas as smooth as I could be bothered (I KNOW I could've got it better & next time, I will) I've ended up with a lock & trigger that feel as smooth as anything I've ever felt. The trigger breaks like a glass rod, with zero creep.

Once again, please don't take this as a 'definitive guide to tuning locks' 'cos I'm pretty sure it's a dang long way from that! It's just a quick pictoral of what I did to MY lock & trigger to try & get them a little better than they left the factory.
Like I say, if the guys who actually know what they're doing are reading this & chuckling into their beards, could they please point out what I need to do to improve, so that folk like me who like to tinker don't make the same mistakes twice!

This improved the weight of pull and the trigger now breaks without getting hung up. In the process I've discovered that the lock plate of my gun is warped. Doesn't seem to affect function, wonder if this was the result of case hardening.

One other thing I noticed is that the business end of the plastic factory ramrod appears to be steel (pretty sharp too). Anyone thinks this a concern? A ss range rod with a muzzle guide is one thing, but this seems like asking for a nick in the crown/rifling, especially trying to reload in the field after a shot at game. I did order a brass range rod, but it won't be going hunting.

Thanks.
 
Glad you found a fix! Always nice to get your gun like you want it. As I only use the ramrod for field loading and use a brass range rod for everything else, I would not be concerned with the infrequent use of the steel, but lots of use... May... Cause you accuracy issues.
 
One other thing I noticed is that the business end of the plastic factory ramrod appears to be steel (pretty sharp too). Anyone thinks this a concern?
Well it's not steel, I don't think they're dumb enough to place an item on the factory ramrod that could damage their own rifles bore.
(they'd loose in a litigation and have to replace a lot of barrels)
More likely an anodized aluminum alloy (softer then the barrel) If it's sharp, rub it on a scotch scrubby or some steel wool,,
 
You could be correct, but it may be steel he is seeing. As long as the steel on the ramrod is a softer grade than the barrel, no harm no foul I would think. Pretty new to the ML game but in center fire circles most experienced shooters prefer steel rods to aluminum. You don't see brass rods at all in that game. [At least I haven't] They don't want the rod shedding anything in the barrel. [I would rather use brass than aluminum for Cf but I have never seen one.] They believe that is worse for the rifling than an occasional parallel swipe of the rifling by a steel rod. You have to really over force [w too tight a patch or brush] a steel rod to make it score the rifling. The newer, coated rods for CF rifles are also recommended by many experienced shooters as the coating seems to stay on the rod really well. [The early ones not so much] That is what I now use for Cf rifles. I have many Cf rifles and have been reloading for accuracy for all of them for about 30 years. That said, this gives me no real expertise in ML rifles so I am very open to instruction as to why these ideas are invalid here. Are modern ML barrels at the soft end of the steel spectrum compared to Cf rifles and would this still make a softer grade steel rod, or portion thereof, problematic ? If a guy is open, he just can't stop learning. SW
P.S. Never underestimate how dumb some companies can be. Lawyers count on it for job security.
 
Steve,

I found that when loading a very lightly lubed, tight ball patch combo even with a bore guide the factory delrin rod was bending and rubbing against the barrel like noodle. I got a brass range rod and a solid aluminum one with a brass loading tip for an underbarrel rod.
 
Steve,

I found that when loading a very lightly lubed, tight ball patch combo even with a bore guide the factory delrin rod was bending and rubbing against the barrel like noodle. I got a brass range rod and a solid aluminum one with a brass loading tip for an underbarrel rod.
I think that sounds like a good plan MS. I don't think you scuff off to much of anything in a ML barrel from what I can tell. But if it was bending that much, a break was probably around the corner. The TC Hawken I am using has a delrin rod and, after using a starter, it slides patched balls and Hornady GP conicals w no issues. Your barrel is probably just tighter than mine. As I compare ML rifling to much faster twist CF rifling, the latter looks much sharper and, of course, its more abrupt angle to a rod lends itself to scouring the rod. Maybe my imagination, but the wide flats of the ML barrel lands I have checked out almost look slightly beveled as they descend into the grooves. It seems to me, even if the last mentioned is never true, those ML barrels should be much more forgiving of bad behavior because of slow twist and very wide lands and grooves. Hopefully, the experts will chime in to adjust my foray into deep water. Where did you get your 2 new rods and the other details ? Thanks SW
 
I got a brass rod from October Country and the solid aluminum rod is from spinjag. Cut both to length. The loading tip made by TC did not have concave cup, more of a cylinder. I noticed that that kind of tip presses a ring into a pure lead ball when loading. Thus, I filled the cavity with epoxy and had it set with a round steel measuring cup with some tape on it to make a concave surface. Did the same for my short starter. Now the roundballs don't get engraved rings from loading.
 
I got a brass rod from October Country and the solid aluminum rod is from spinjag. Cut both to length. The loading tip made by TC did not have concave cup, more of a cylinder. I noticed that that kind of tip presses a ring into a pure lead ball when loading. Thus, I filled the cavity with epoxy and had it set with a round steel measuring cup with some tape on it to make a concave surface. Did the same for my short starter. Now the roundballs don't get engraved rings from loading.
Great info. Thank you! Not sure how my rr tip fits the round ball. I did not look closely when shooting them. I used them to get close to sighted in and then switched to the Hornady GP 385 conicals for fine tuning because I wanted to hunt w those. I think those marks would mess w a round ball but not so much w a big conical. I did look at those bc I pulled one and bc you have to give them a pretty good rap w the starter to get them started. As soon as they engrave, they slide down pretty easy. I used a Traditions polymer starter bc I wanted to keep things as light as possible for hunting. I will get a brass one for range work. I don't think the polymer one can handle a steady diet of conicals. I am wondering if I could put a light coat of vaseline on a round ball and force it against a blob of JB Weld placed on the rr tip and hold it there until it sets and then trim off the excess. If it held it would be a perfect fit. Thanks again for the useful advice and info. SW
 
No problem! When I filled the loading tip with epoxy and clamped it in against the concave surface I set the clamp holding everything together with the loading tip pointing down. That way all the bubbles settle at the back of the tip and the concaceve surface is filled in smooth without any air bubble cavities. Its probably more effort than most would pursue, but I'm seeking to get the best accuracy out of my gun and pressing marks in the roundball will be one less variable to worry about.
MS
 
Back
Top