• This community needs YOUR help today. We rely 100% on Supporting Memberships to fund our efforts. With the ever increasing fees of everything, we need help. We need more Supporting Members, today. Please invest back into this community. I will ship a few decals too in addition to all the account perks you get.


    Sign up here: https://www.muzzleloadingforum.com/account/upgrades
  • Friends, our 2nd Amendment rights are always under attack and the NRA has been a constant for decades in helping fight that fight.

    We have partnered with the NRA to offer you a discount on membership and Muzzleloading Forum gets a small percentage too of each membership, so you are supporting both the NRA and us.

    Use this link to sign up please; https://membership.nra.org/recruiters/join/XR045103

What Muzzleloading Stuff Did You Do Today?

Muzzleloading Forum

Help Support Muzzleloading Forum:

This site may earn a commission from merchant affiliate links, including eBay, Amazon, and others.
20220706_114927.jpg

Cast some shiny things
 
Yep, a fencing tool, one side to hammer in fencing staples and the hook side to pull them out, the notches are for pulling the fencing tight.

This is a gun flint knapping hammer I made from an old file and a tack hammer handle. The file hammered into the log is and anvil of sorts for holding the flint for knapping.

Here is one in action;


View attachment 148335

How cool,.. but you know all those guys probably died from silicosis
Yikes!
 
Yes, definitely not fencing tool. Not too often you need a wrench for fencing.
I’ve needed a wrench for about every fence I’ve ever built, but you’re right. Not knowing for sure was killing me so I hunted till I found it. It’s called a Vulcan Auto Tool. Came on the market in 1910 and apparently is an early multi tool.
 

Attachments

  • 1D9226CF-1EA3-4BC4-99A9-58247FEB1563.jpeg
    1D9226CF-1EA3-4BC4-99A9-58247FEB1563.jpeg
    77.8 KB · Views: 0
I’ve needed a wrench for about every fence I’ve ever built, but you’re right. Not knowing for sure was killing me so I hunted till I found it. It’s called a Vulcan Auto Tool. Came on the market in 1910 and apparently is an early multi tool.
Ok, cool! But I bet the inventor never thought it would be used to make flints!😂
 
My 1766 Charleville Carbine project is complete. Mr. Paul Ackerman, of New York, did the work,

Musket started as an older and used Japan made 1766 Charleville Musket from Dixie Gun Works.
I wanted a companion piece, to go with my 1777 Charleville pistol, but I wanted a carbine length musket.

Paul said that an older japan made gun would be much better than the newer India made ones. I found this one
on an auction. YEah...I paid more than I wanted to, but I never expected these guns to be priced so high; and so few and far between.

This is my first flint lock musket. I have a few accouterments, but I am not really into re-enacting (Did my share of Civil War from 1984-1998), this is just going to be a fun gun. (A lot of money to spend, just for fun! But hey, I didn't spend it on booze nor women and i will still have the musket!)

Here are some pics.....and the pistol, too
I picked up the musket from my dealer. Had it shipped there for protection from porch pirates, because I am away from home.

Took this group pic with 1777 pistol and accouterments
 

Attachments

  • 288964917_2591892284281426_19963581931735187_n.jpg
    288964917_2591892284281426_19963581931735187_n.jpg
    212.4 KB · Views: 0
  • 289091815_1052451378974621_6079903900758638943_n.jpg
    289091815_1052451378974621_6079903900758638943_n.jpg
    205.3 KB · Views: 0
  • 289938852_807214836931781_6216779554191254433_n.jpg
    289938852_807214836931781_6216779554191254433_n.jpg
    187.1 KB · Views: 0
  • 290147079_1206061100192065_2586888294967288421_n (2).jpg
    290147079_1206061100192065_2586888294967288421_n (2).jpg
    235.1 KB · Views: 0
Last couple of days went through my black powder pistols. Cleaned and oiled them all again. Always can find a little something you missed.
 
I have been putting snippets of this project in this thread, here is the whole thing start to finish.

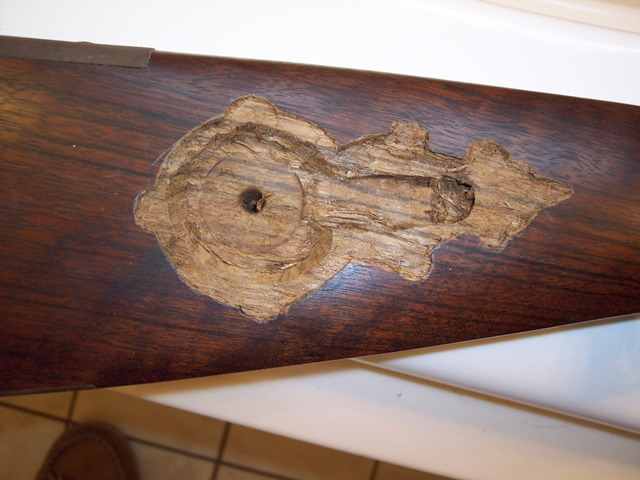
My nephew, who has never inletted anything, tried to put a patchbox in his Lyman GRP, not knowing how to approach the project he used a Dremel tool and no layout lines, disaster! In this picture I had already fixed the back end with proper inletting, the front is going to be a challenge.

9aCruV0.jpg


My mouth always get me in a lot of trouble so I said" no problem I can fix it", big mistake, I had never inletted an ornate patch box but had built 5 guns so I thought "how difficult could this be".

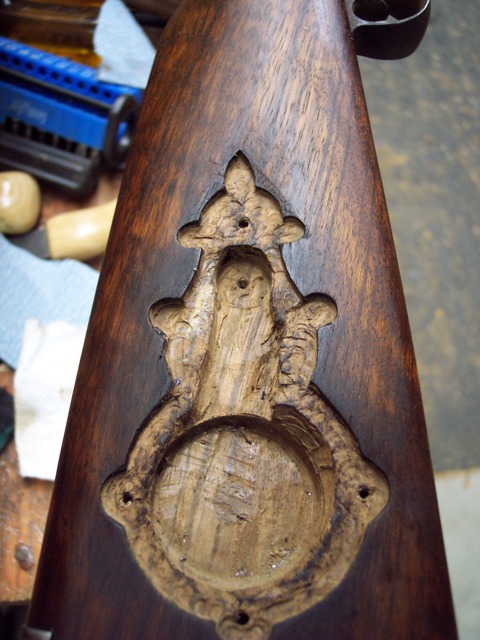
I started patching the gaps with glued in walnut pieces, I orientated the patch wood grain with the stock wood, even drew in grain lines from the stock wood through the patches with walnut husk dye and a calligraphy pen to make the patches disappear. I had to completely remove the finish while filing the patchbox metal to fit the wood.

I built up layers of my walnut husk dye and dried it with a heat gun until I had the stock stain on the bare wood matched perfectly to the factory stock stain.

I left the stain darker around the inlet to further hide the patches. I worked what you see in the picture down a bit more with a scotch bright pad to further blend the color after I took this picture.

G4aaMXz.jpg


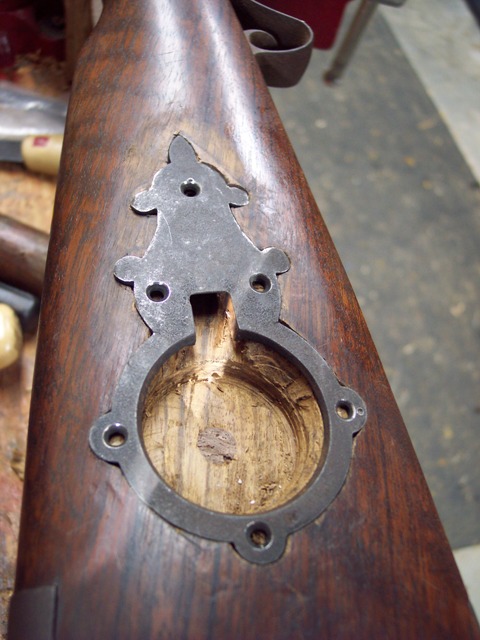
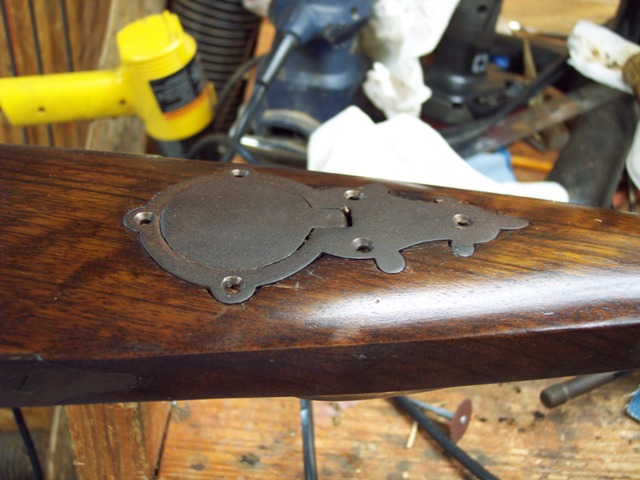
The patch box was flat the buttstock was curved, I initially thought there was enough room to to fit the flat patchbox into the buttstock but found out it had to be bent to conform. The patchbox is steel and didn't want to bend, I had inletted the outside edge of the inlet and it took dozens of poundings and several days to get all the edges properly in the inlet I cut. The biggest problem was getting the lid to bend and still match the hole it was supposed to fit into the metal opening.

Here is the patchbox just starting in, you can see all the patches.

SDqNS3a.jpg


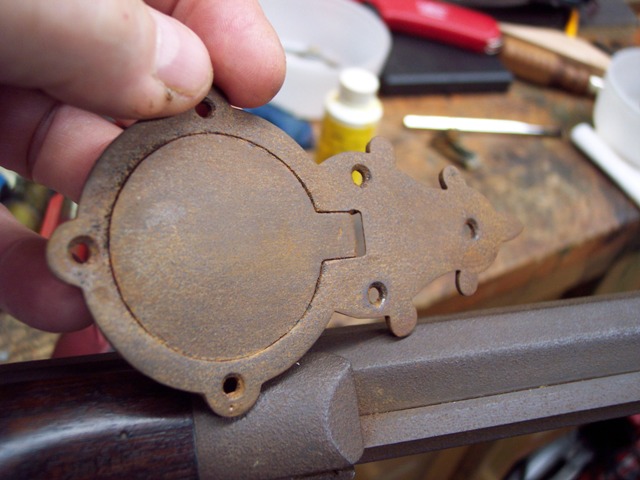
In the process of bending the lid I broke the hinge pin, no problem I thought, jut use a punch and drive out out but it wasn't moving. I decided to drill it out, after ruining 3 drill bits i realized the pin was hardened and nothing short of a carbide tipped bit would touch it. The carbide tipped bits cost $13 for a 1/16" bit, not the kind of money I wanted to spend on someone else's bo-bo. I ended up heating and annealing the hinge several times to try to soften the pin, this worked and I could drill the pin right out. After all this fitting I realize the patchbox lid would never function as intended, I soldered the lid into place and told my nephew his patchbox was now just for looks and wouldn't work as intended, turns out that was what he was after in the first place, just some ornate bling on his rifle.

Now to brown the patchbox to match the pitted rust browning job my nephew did on the gun. It took a while but I finally got the pitting just right to match.

U4Q6wB9.jpg


Finally in, the inlet is tight the patchbox will tap in flush with the wood but except for browning the screw heads it is done.

HYSN5k0.jpg


I had to buy hardware store zinc coated screws, I burned the zinc off but they still didn't want to brown properly. Still working on them and making progress. As soon as I get the screws in I will call this project done.

S3Sgjpe.jpg


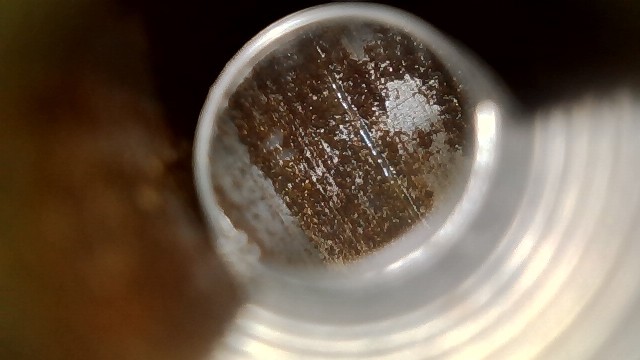
My nephew didn't clean his rifle properly, the barrel is a rusty sewer pipe but I have been able to clean it up with a number of red scotch bright patches to be serviceable.

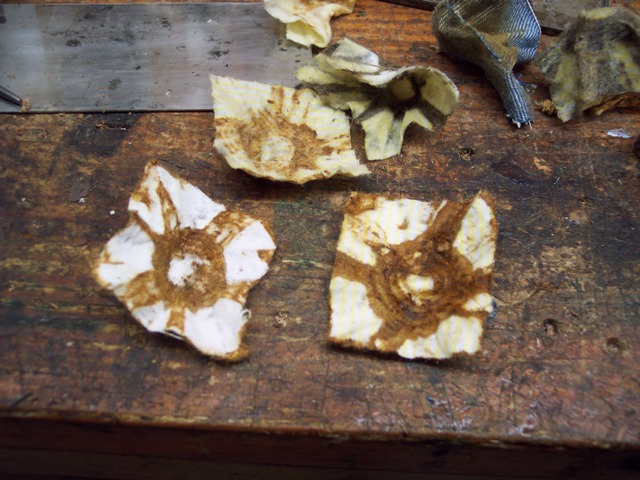
Here are the first patches I ran down the bore to see just how bad it was.

qHRThlD.jpg


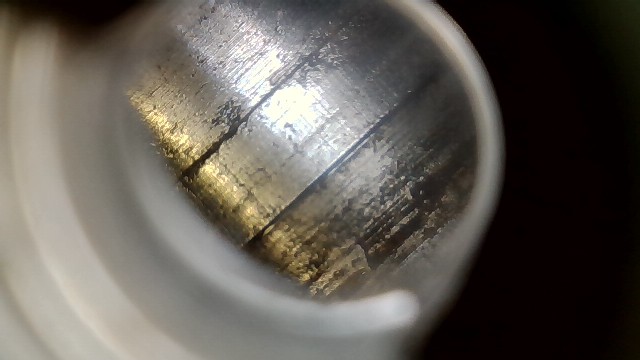
It looks much better after the scrubbing, I think it will shoot just fine.

Before;

bSLMvdu.jpg


After a good scrubbing;

9Ig16Zw.jpg
 
Great save on that gun Eric 👍👍

Give that Nephew a little instruction on how too properly care for a muzzleloader..
And hide his Dremel! 🤣
Good looking gun now , Congrats too you both.👍👍
 
Back
Top