• This community needs YOUR help today. We rely 100% on Supporting Memberships to fund our efforts. With the ever increasing fees of everything, we need help. We need more Supporting Members, today. Please invest back into this community. I will ship a few decals too in addition to all the account perks you get.


    Sign up here: https://www.muzzleloadingforum.com/account/upgrades
  • Friends, our 2nd Amendment rights are always under attack and the NRA has been a constant for decades in helping fight that fight.

    We have partnered with the NRA to offer you a discount on membership and Muzzleloading Forum gets a small percentage too of each membership, so you are supporting both the NRA and us.

    Use this link to sign up please; https://membership.nra.org/recruiters/join/XR045103

Input on a Kibler Build

Muzzleloading Forum

Help Support Muzzleloading Forum:

This site may earn a commission from merchant affiliate links, including eBay, Amazon, and others.
Joined
Sep 21, 2020
Messages
312
Reaction score
183
Location
Indiana
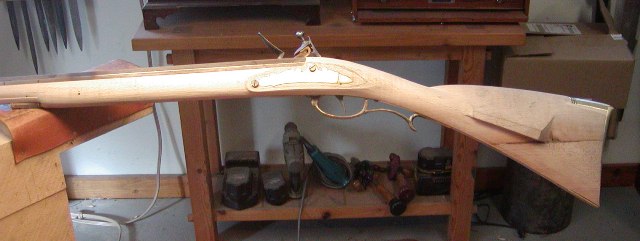
Just got my Kibler Colonial kit this week. To give an idea of my skill level as you consider my question, this is my first build ever.

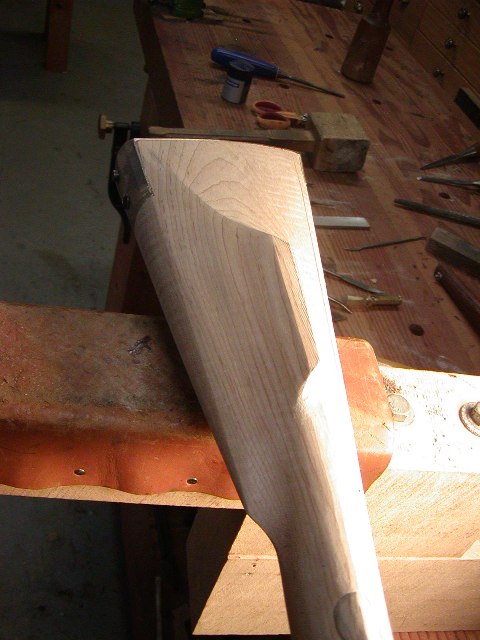
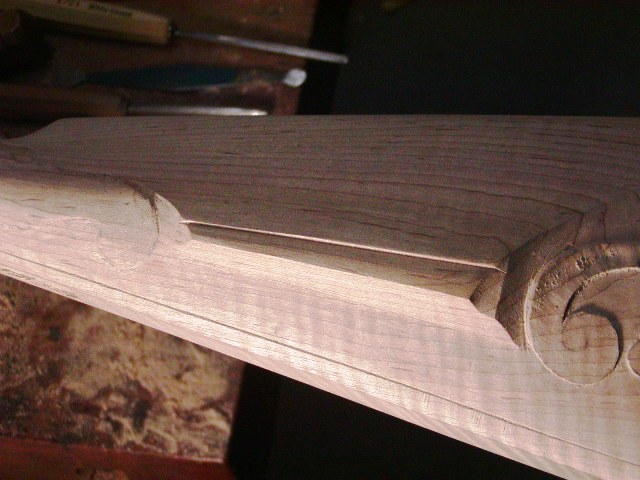
I’d like input on the cheekpiece. There’s a little bobble on the end closest to the butt plate; it’s rougher and also dips down slightly compared to the remainder of the cheek rest. It’s hard to photograph but I tried to do so.

I ran it by Jim via Lorie and he said just to sand it with a sanding block. Sounds easy enough, but it’s my first build and I don’t want to screw up this fine gun out of the gate so I have a couple questions for the learned folks here.

With a cheek rest like this, is the goal that it be a uniform height? That is, if it is 1/2” high at the one end of the rest, should it be it 1/2” inch high at the other end as well?

To determine a line to sand to, would it be reasonable to mark a line (similar to what I did with the red line in the photo) and sand down to that point?

Any other suggestions or considerations are appreciated. I’m sure I’m overthinking a pretty straightforward task, but I tend to want to try get things right (and by right I mean perfect) the first time.

Thanks!
 

Attachments

  • 7B8618DE-6EBC-4D8A-8157-F3C5B917B27D.jpeg
    7B8618DE-6EBC-4D8A-8157-F3C5B917B27D.jpeg
    79.7 KB · Views: 5
  • 022E2FE8-0BC6-42E2-94D6-4BC398197423.jpeg
    022E2FE8-0BC6-42E2-94D6-4BC398197423.jpeg
    92 KB · Views: 0
  • EA5E6672-43DB-4AAB-8C91-57E51043A7E6.jpeg
    EA5E6672-43DB-4AAB-8C91-57E51043A7E6.jpeg
    94.8 KB · Views: 0
I would just sand and shape it to what you want. There’s a lot of wood on that stock that can go.
I think that makes a lot of sense for someone with a bit more experience than myself, but since I don’t really have a good sense of what wood should go, what should stay and how best to make that happen, I’m trying to keep my modifications pretty minimal this go round.
 
What you are doing is very personal. Make it yours. Even if you have a pattern of a particular rifle from a certain time frame, what you build will be you, your heart and soul. I put mine together first time and held it, took pics, looked at Davy Davis’s “deathwind” again to get a feel for the NW Carolina Mtns. Treasure i wanted to emulate then began to cut away, scrape and sand and rub the stock into my personal liking. All along the way the color and texture of the wood, the emergence of grain, the furniture tone and depth to match the chosen stain or blend of stains took shape in what i had to have in my hands for the rest of my life. Shiney, bright, plain, ornate, new or used, vintage, soulful or an old barn workhorse… it becomes you. May God guide your hands as He did for many in our past who depended on the results to provide and protect.
 
I think that makes a lot of sense for someone with a bit more experience than myself, but since I don’t really have a good sense of what wood should go, what should stay and how best to make that happen, I’m trying to keep my modifications pretty minimal this go round.
All i am saying is you have a lot to wood to work with. I have the same colonial and it’s a big stock. IMO overall mine will be thinned. If you’re only concern is that cheek not sure how much studing you’ve done I think it needs a lot of altering. Yes you can sand it and be done with it. That chatter is there because there was a change in grain direction. Just block the surface and be done with it. If you think it’s a defect I would say no. I think there’s more wood then needs to be be there. But that’s for you to decide you will have fun with it.
 
All i am saying is you have a lot to wood to work with. I have the same colonial and it’s a big stock. IMO overall mine will be thinned. If you’re only concern is that cheek not sure how much studing you’ve done I think it needs a lot of altering. Yes you can sand it and be done with it. That chatter is there because there was a change in grain direction. Just block the surface and be done with it. If you think it’s a defect I would say no. I think there’s more wood then needs to be be there. But that’s for you to decide you will have fun with it.
And most will address the stock after the rifle is fully assembled.
 
Thank you all for the input, all are good thoughts and considerations! My primary hesitation is that I think a stock that is slightly thick or less customized but finished cleanly is more appealing than one where the modifications come across as poorly executed or amateurish. I hope my skills develop and this is the first of many rifles than are increasingly customized as my abilities grow, but I’m feeling the need to be conservative to start. In any event it sounds like the consensus is that this is an aspect to address further into the build rather than right away, so I’ll be thinking about your comments as I work.
 
Hi,
I think what you were describing is that the upper edge of the cheek piece is not straight and has a slight upward curve at the end? If that is the case, just use the rounded side of a half round file and gently straighten the edge. Draw a guideline on it first so you can visualize "straight". The flat face of the cheek piece often will widen toward the rear as yours already does. It does not need to be the same width for its whole length, although that is OK as well. Here are examples of cheek piece designs. Ignore the carving and inlays and just focus on how the wood is shaped.
htgdY8b.jpg

RAmyKhI.jpg

dgntHRT.jpg

Mxlf02S.jpg

WUVCfHB.jpg

FQMVEaL.jpg

Ni07lE1.jpg

jJtRGZ1.jpg

UCJBQpa.jpg


As you can see, there are many ways to shape the cheek piece and no hard rules except to make sure it works to make the stock fit you. It can have an even height, or rise a little toward the rear. The edge can be an even flat or widen toward the rear, or have decorative lines and grooves, or just be rounded over. You get to choose.

dave
Thanks Dave, the photos are very helpful as I’m still working on visualizing the possibilities. Actually my issue is that the cheek piece has a slight downward curve at the end, so I’m considering how to bring it all down to that level. I wasn’t sure if I’d end up removing too much material if I just sand until all is flat. I know I could carve around the cheek piece which would essentially increase its elevation, but that’s where I start to hesitate a bit based on my lack of experience doing such things.
 
Lay a ruler or other straight edge down the length of the cheek piece and look under it there where the blemish is, to visualize how much wood needs to come off the rest of the cheekpiece to make it flat and true. I'm betting heavy odds it's not very much. Take it down with a block plane set for very thin shavings. That's the best way to keep it flat and true. As you remove wood the width of the flat will grow corresponding to the radius of the wood along side the cheek piece. It may become wider than you want. If so, simply strike a guide line on the flat for the width you want and adjust the radius of the wood to that line.
 
Lay a ruler or other straight edge down the length of the cheek piece and look under it there where the blemish is, to visualize how much wood needs to come off the rest of the cheekpiece to make it flat and true. I'm betting heavy odds it's not very much. Take it down with a block plane set for very thin shavings. That's the best way to keep it flat and true. As you remove wood the width of the flat will grow corresponding to the radius of the wood along side the cheek piece. It may become wider than you want. If so, simply strike a guide line on the flat for the width you want and adjust the radius of the wood to that line.

Thank you!! That’s very helpful!
 
I would make up a sanding block about six inches long and lay it flat (and keep it flat) while you work the entire length of that surface to flat.

My advice is based on what I think your question was. Other responses here suggest that we as a group haf different interpretations of you question so if I got it wrong, ignore my suggestion. 😀
Ha, I think you’re on target longcruise. That sounds like a good way to go about it! Thanks!
 
i hadn't thought of a plane, but that would keep the edge much flatter than a sanding block... if you have no plane, a sanding block will work, but make it as large as is comfortable.

Good luck with your build!
 
I really have no intelligence or practiced advice to offer, but Dave, oh those photos. As I am waiting for my Kibler to arrive, I drool. they are so on point for where I want to go
 
Hi,
I think what you were describing is that the upper edge of the cheek piece is not straight and has a slight upward curve at the end? If that is the case, just use the rounded side of a half round file and gently straighten the edge. Draw a guideline on it first so you can visualize "straight". The flat face of the cheek piece often will widen toward the rear as yours already does. It does not need to be the same width for its whole length, although that is OK as well. Here are examples of cheek piece designs. Ignore the carving and inlays and just focus on how the wood is shaped.
htgdY8b.jpg

RAmyKhI.jpg

dgntHRT.jpg

Mxlf02S.jpg

WUVCfHB.jpg

FQMVEaL.jpg

Ni07lE1.jpg

jJtRGZ1.jpg

UCJBQpa.jpg


As you can see, there are many ways to shape the cheek piece and no hard rules except to make sure it works to make the stock fit you. It can have an even height, or rise a little toward the rear. The edge can be an even flat or widen toward the rear, or have decorative lines and grooves, or just be rounded over. You get to choose.

dave
Dave those carvings and inlay are gorgeous!
 
Back
Top