• This community needs YOUR help today. We rely 100% on Supporting Memberships to fund our efforts. With the ever increasing fees of everything, we need help. We need more Supporting Members, today. Please invest back into this community. I will ship a few decals too in addition to all the account perks you get.


    Sign up here: https://www.muzzleloadingforum.com/account/upgrades
  • Friends, our 2nd Amendment rights are always under attack and the NRA has been a constant for decades in helping fight that fight.

    We have partnered with the NRA to offer you a discount on membership and Muzzleloading Forum gets a small percentage too of each membership, so you are supporting both the NRA and us.

    Use this link to sign up please; https://membership.nra.org/recruiters/join/XR045103

trying something totally new to me

Muzzleloading Forum

Help Support Muzzleloading Forum:

This site may earn a commission from merchant affiliate links, including eBay, Amazon, and others.

Oldnamvet

40 Cal.
Joined
Mar 19, 2008
Messages
363
Reaction score
1
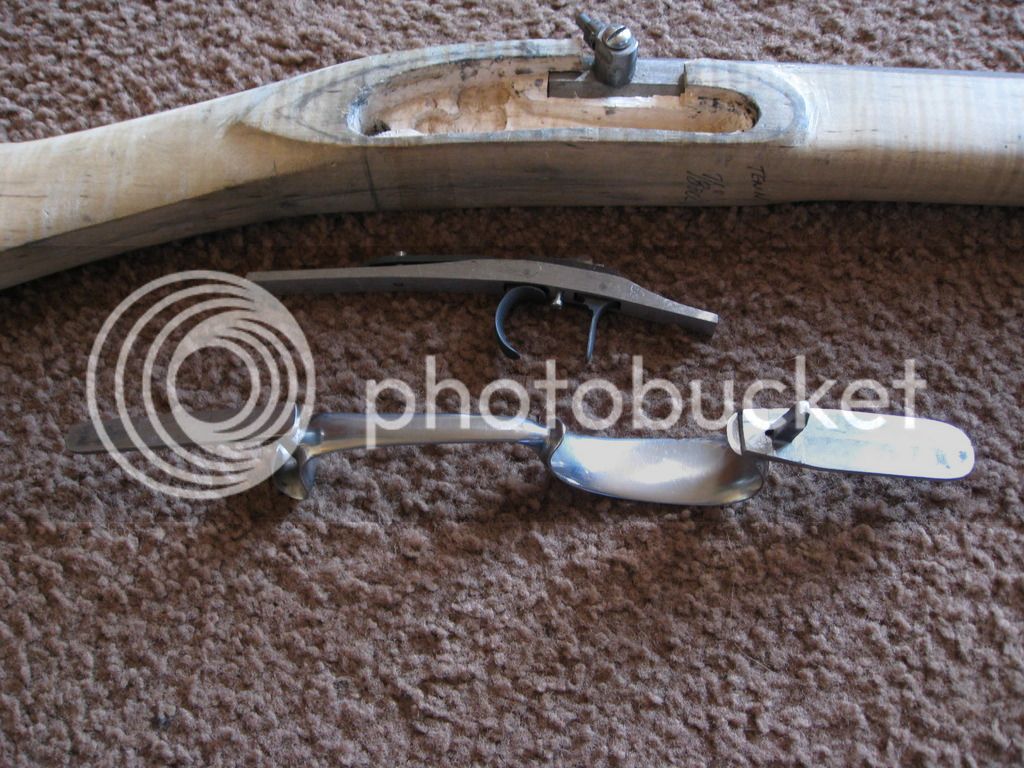
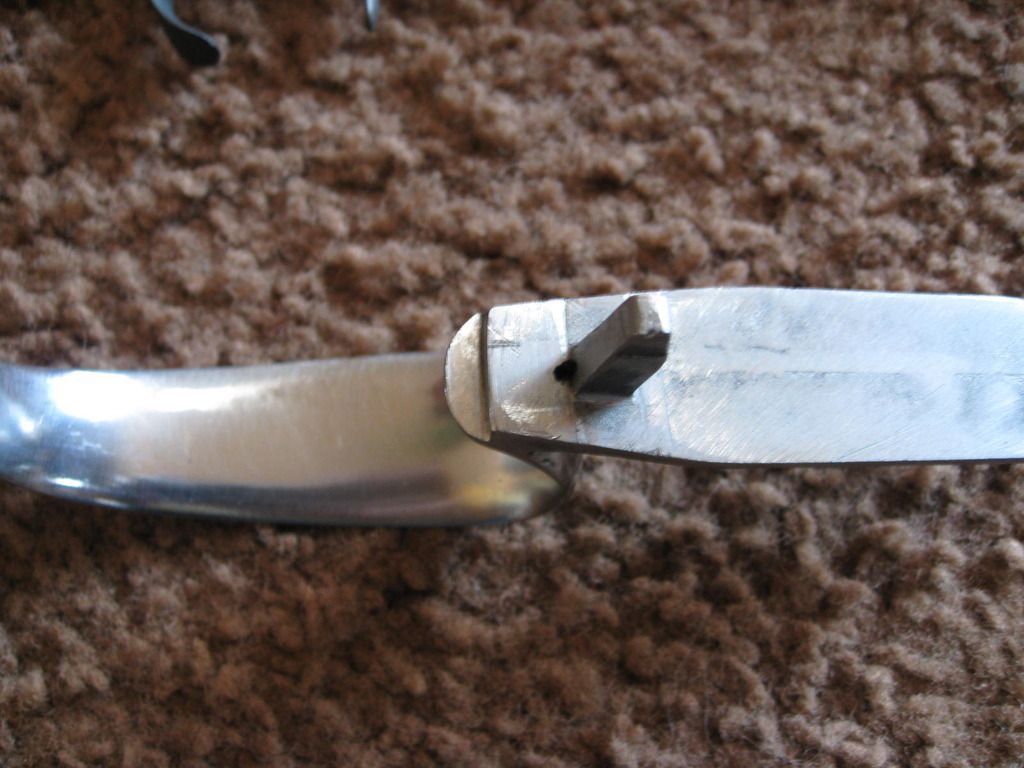
About 25 years ago, a friend purchased parts to make his own rifle. And it then sat collecting dust until now his arthritis makes working on it impossible. Soo I bought the box of parts along with stock and barrel ($300) so I can give the project a try. I have worked on other guns so it is not totally new but I do have a few questions as I sort through the parts. The large metal spike at the front of the trigger guard--what is it for? A tab to pin the part I would understand but his is more like a nail sticking up. To put it in I would have to drill a large hole through the set trigger plate. With the dimensions I have to work with, the trigger guard would have to set on the surface of the stock. Inletting it would push the trigger assembly into the stock so far it would contact the lock. Then there is the issue of drilling for the tang bolt to go into the front of the trigger plate. with the geometry of the trigger plate, there would be quite an angle to drill into it. Any suggestions? I got an L&R lock, Green Mountain barrel (40 cal), and a Penn style stock with lots of stripe figure the entire length.

 
ALL trigger guards needs inletting just a tiny bit....and the spru can be used for the front attachment by inletting, then drill a pin hole....I think you need to get a GOOD book on flinter building, better to understand.....i.e.~as the tang bolt is supposed to be 90degrees to the tang...and what ever that angle is, the drill n tap to the trigger group IS correct then........
nice group of parts....it will be easier for you to understand with further research, these things have a way of their own.....the 'lines' have to flow right, the 1st time.....readreadread.....and you'll turn out a good one.
marc n tomtom
 
That seems really high. Off hand I think you could file it down a bit and pin. BUT....wait for someone else to comment. Maybe there is some reason it is so high.
 
The protrusion is the gate the metal was poured thru when the casting was made.
Whether you use it for the cross pin to hold the trigger guard in place or not depends on you and what you want.

When it comes to things like this, one must remember, castings are just the raw stock to make the finished part.
There is no reason you can't shorten the gate by filing it off so it won't stick as deeply into the stock.
Most of the ones on my rifles have been filed so they are about 1/4" - 5/16" tall. That's tall enough to make them an easy target for the crossdrilled pin hole and still short enough so they don't interfere with the ramrod.

Part of your decision as to whether you use the gate or simply file it off and use a small screw to hole the trigger guard in place will depend on how accuretly you want your gun to be.

The Tennessee rifles often used a screw to attach the trigger guard.
The Pennsylvania rifles almost always used a cross-pin.

Oh. To work as a tang for a cross-pin it doesn't have to be as wide as it is.
Filing off the sides to leave 3/32 - 1/8" of width will reduce the amount of metal the small cross-pin drill needs to go thru.

Also, you will have to do some sliding things back and forth to see how much of the guard bow you want in front of the trigger.
If the gun is going to be used for hunting where gloves are common, the distance will be greater than if the gun is always going to be used in warm weather.

Once you decide where to position the trigger guard you will find out if the gate is really going to interfere with the front of the trigger plate.
If it does, look carefully at the trigger plate.
Often, the front of it can be filed to move it "back" a bit to clear the trigger guard gate.

Have fun.
 
I'm a kind of, "Monkey see...Monkey do guy", so I would take a good look at a finished rifle or several finished rifles, (if possible). Look at some that use a pin in front and screw in back and one that uses screws in both places. You can get a feel for the inletting of the trigger plate in relation to the trigger guard. The position of the trigger plate, is critical, to how it will function. I would seek out someone, that would guide me, in the right direction.
You have the chance to have a very nice rifle, at a very low price. At least you're doing the right thing, and asking questions. All good advice so far, but more needed.
 
There are tips and maybe some illustrations on this site, as how to use a sharpened threaded to rod, mounted on a drill press table, to help align the drill for drilling a trigger plate and tang, in perfect alignment. You might want to search that.
 
Thanks to everyone. I will be cutting it off since there is no way to set it without drilling a hole in the trigger plate and then there would be no place for the tang bolt to thread into the front of the plate. The gun will be mainly a shooter although I will do my best to make it look nice. Being a woodworker I can see that the tiger stripes in that stock will look amazing with a good oil finish. Some work was done on the stock so I may have to make some compromises as to how I would like things to be. I have until next deer season to get it ready so I can take my time and avoid things like a dremel tool.
 
Note the notch right before the guard lug. If you want to pin the front of the guard, simply cut off the the front of the set trigger plate.

Screwing down the guard is is an option as well. but......if you dont trim the trigger plate, likely your screw will go into the plate. It's the same problem as the lug would have been.
You cant put the screw too far forward because it may fall into the ramrod channel.

Before all that....
You need to lay this out and find the relationship of how the parts will work,then choose how to assemble.
must know where the ramrod channel ends...
must know where the sear of the lock is
must know where to place the trigger plate in relation to the sear bar of the lock
must know where to place the triggerguard in relation to trigger/finger space (sometimes the triggers themselves may need to be trimmed)
must know how much to trim the triggerplate
must decide on method of attachment.

As said you need to get a book or even a good DVD...a book is always there ready for you to study.
I suggest Gunsmith of Grenville County and Recreating the American Longrifle.

You see in the layout of a rifle you have several things all meshing together....that's why I suggest some study material. This is one of the hardest areas to figure out and as you can see where the project stalled for the original owner...

You can simply screw the barrel tang down with a wood screw. On my recent Gillespie build, the barrel tang was screwed down with a large wood screw and the triggerguard was secured with screws. the trigger plate was simply held by the trigger guard. This was how the original was built.
 
Personally I like the front TG lug to be high so the pin hole is hidden behind the lock and sideplate. Also it should have more width fore and aft....a larger "target" when drilling the pin hole....Fred
 
My Virginia rifle is pinned, both front and back. I have other rifles that have screws, both and back. So I guess there different style trigger guards and trigger plates, that allow for a choice. However some may not be historically correct, if that matters.
 
You can move the lug if you need to. I broke two drill bits off in one while it was in the stock and buggered the original one up so bad getting the bits out it was useless. I made another lug and soldered it on.

 
First, read and understand how it all fits together. Dixons book is not complicated and should get you there.
If it's important to you, make sure all the parts work together. That's a southern trigger guard that you're using with a Penn stock.
Front of trigger plate can be shortened with plenty of room for your tang bolt. Also, the trigger plate should be inletted flush, and the bars lower for you particular set up.
Read first, measure twice, measure again, cut once.
Good luck.
 
Got "Recreating the American Longrifle" by Buchele, Shumway, Alexander to use as a first guide. Also found that the stock is marked as Tenn and not Penn.
Going to start some work this weekend after turkey binge. Something to do while sitting down.
 
I'd recommend that you also get a copy of The Gunsmith of Grenville County by Alexander. It's available from Track of the Wolf and is kind of spendy, but you'll save more than the purchase price in parts you don't ruin. (Then there's the bad language you don't use, and the time waiting for replacement parts, and so on).

Good luck with your build ... keep taking pictures ... we love pictures...
 
I was busy over the holidays and it was good therapy for me. Finished (for now) and waiting for warm weather to take it out for sighting in.


Thats nice! what size is the thread size on the drum is it 1/4 x 28 ? I'm building a .36cal. with a Bedford CO. L&R lock I want to be able to go from cap to flint.
 
The drum size is 5/16 x 24. I don't know the maker since it was purchased about 25 years ago by the guy I bought all the parts from. Back in the days before on-line shopping from a local store known then as Ye Olde Black Powder Shoppe. We all miss that place.
That rifle came out incredibly well balanced for off-hand shooting. Pure luck since I was just trying to make it look nice. Wish the weather was a little nicer and warmer (like about May or June) so I could try it out.
 
Back
Top