• This community needs YOUR help today. We rely 100% on Supporting Memberships to fund our efforts. With the ever increasing fees of everything, we need help. We need more Supporting Members, today. Please invest back into this community. I will ship a few decals too in addition to all the account perks you get.


    Sign up here: https://www.muzzleloadingforum.com/account/upgrades
  • Friends, our 2nd Amendment rights are always under attack and the NRA has been a constant for decades in helping fight that fight.

    We have partnered with the NRA to offer you a discount on membership and Muzzleloading Forum gets a small percentage too of each membership, so you are supporting both the NRA and us.

    Use this link to sign up please; https://membership.nra.org/recruiters/join/XR045103

Correct Use of a Knapping Hammer

Muzzleloading Forum

Help Support Muzzleloading Forum:

This site may earn a commission from merchant affiliate links, including eBay, Amazon, and others.

OldNo7

36 Cal.
Joined
Feb 13, 2005
Messages
171
Reaction score
165
Location
Southern Maine
Long-time percussion shooter here, getting back into the trial & tribulations with a flintlock after a couple of years hiatus...

Believing that there is "No such thing as a stupid question other than the one 'not' asked...", I'll put this question out there for replies, as I'm thinking the experiences and insights shared may be helpful to others too.

See the image posted below...

Q: "Which" face or edge of the Knapping Hammer is the correct one to use?

UKtVfCN.jpg


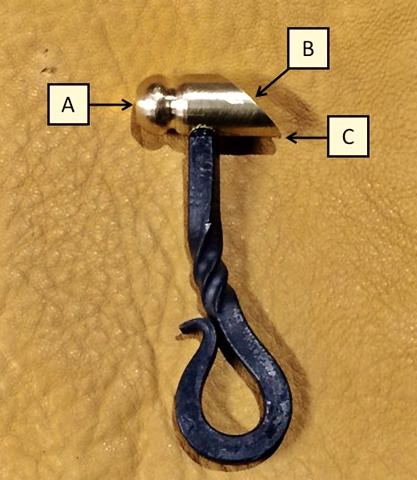
Or, does that depend... If so, on what?

I've viewed several knapping-related videos online, but I haven't see any close-up details that answered my question...

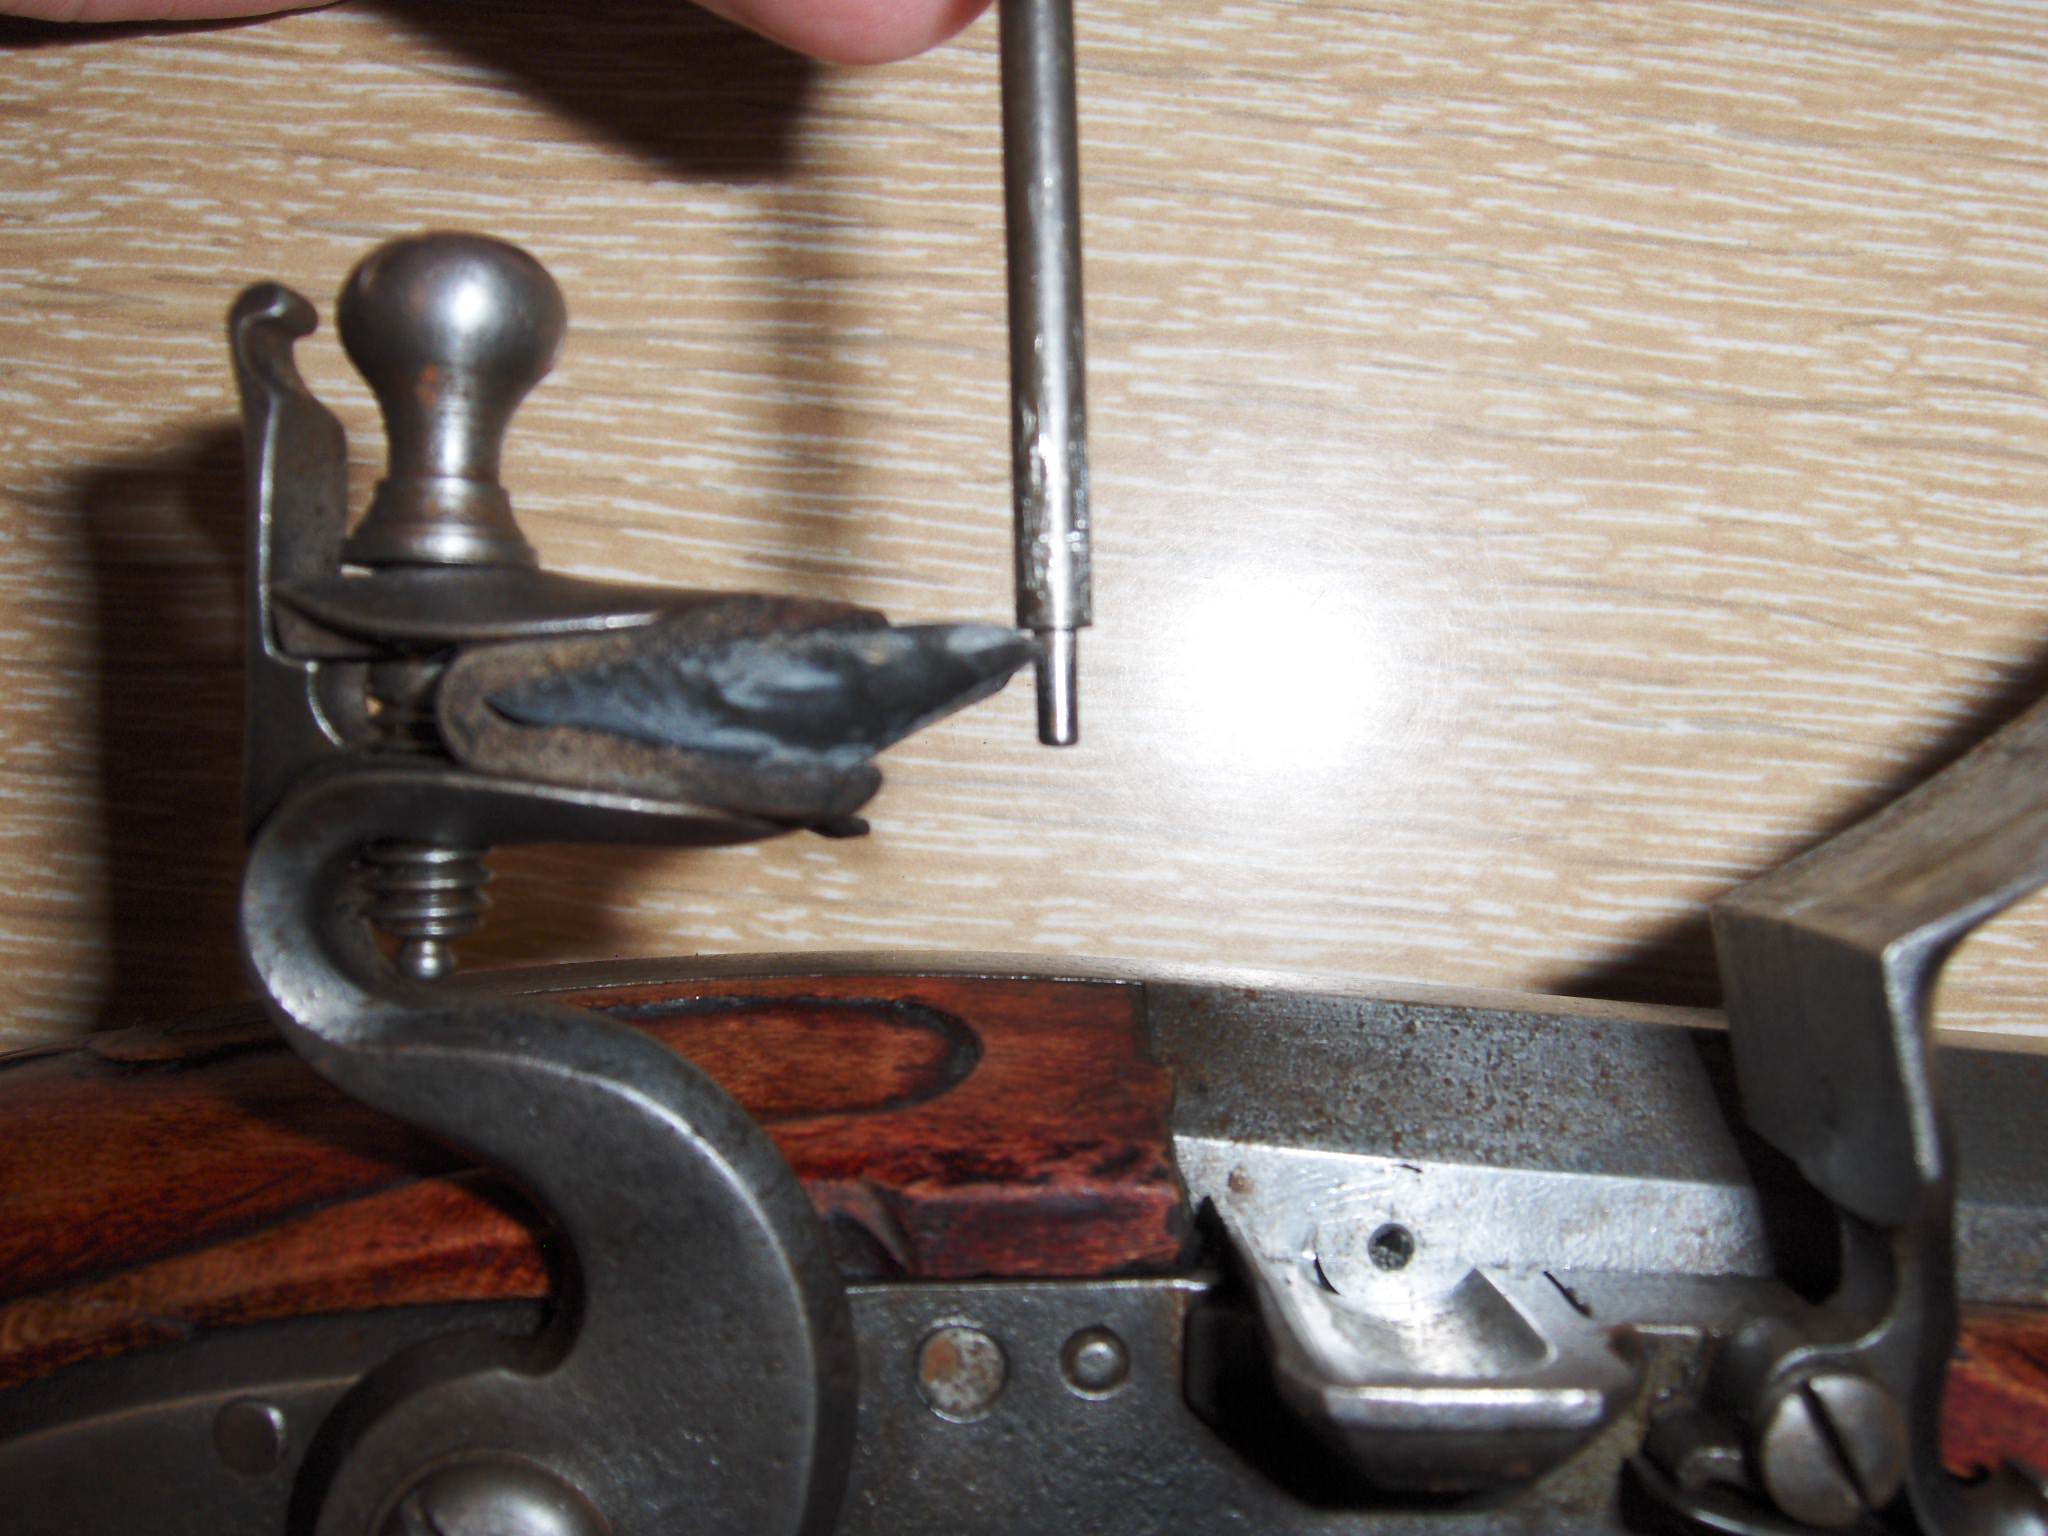
I am aware these are other tools to use too -- the edge of the frizzen, a brass rod, a steel nail with ground-down (smaller diameter) tip, or some type of copper pressure tool. I'd also be interested in comments about those, but I'd sure appreciate some responses about this small knapping hammer that I just acquired.

Thanks in advance for your help!

Old No7
 
It's a work of art but don't use it on good flints as a percussor is a poor way to sharpen them.
Kind of like butchering a deer with broad axe!
Learn to pressure flake with a sharp nail set into a good handle , copper ground wire filed to a point in a handle or a sharp deer antler tine will work nicely as well and your flints will last much longer and be sharper.
 
That doesn't look much like any knapping hammers I use. I would have to see just how the ball side strikes the edge of the flint.

25824101488_8e3bbe5b58_z.jpg


One of my hammers is just above the strap. I use the hammer with the notched nail that is under the strap.

With respect to your flint knapping hammer, remove the flint from the lock as I don't think it advisable to knap the flint in your lockuntill you are comfortable getting an edge. Wrap the flint with leather exposing the edge. Tap the edge with the ball end or press the edge with the ball end to push a pressure flake off the edge. Do that all along the edge until you have a straight and sharp edge on the flint. With the flint out of the lock you can use either the ball side or the beveled side to put pressure on the flint. If you tap the edge, the ball should be easier to control. You will need to practice to determine if the ball or bevel works better for pressure flaking.
 
Knapping, is a work of art. I'm not an artist, so I use a diamond file. I guess a file is not traditional, but can't afford destroying my flints.

One of these days, I might get around to practicing on some old broken flints.

I can not stand for a misfire or delayed action, and because I hunt with my rifle, I just want the sharpest flint, that I can get.

I guess this doen't really answer the question of using a knapping hammer, but just wanted to mention, there are other options.
 
Grenadier1758 said:
Wrap the flint with leather exposing the edge. Tap the edge with the ball end or press the edge with the ball end to push a pressure flake off the edge. Do that all along the edge until you have a straight and sharp edge on the flint. With the flint out of the lock you can use either the ball side or the beveled side to put pressure on the flint. If you tap the edge, the ball should be easier to control. You will need to practice to determine if the ball or bevel works better for pressure flaking.

I should be clearer on how to hold the flint for pressure flaking. You can use a small hand held vise or a vise grip pliers. You want to avoid putting unnecessary stress on the flint jaws and tumbler.

What rifle or what lock do you have? What size of flint are you knapping?
 
From the replies you can see everyone has their own notions on this subject. Yer hammer will work just fine, either side. I often knap sharpen flints in the rifle with a hammer similar to yours. But crucial is to support the hammer/cock from underneath so as to not put damaging pressure on the sear or other lock internals. Tiny taps on the edge of the dull flint should remove small flakes from the underside restoring sharpness. It takes practice. Restoring flints to reliable shooting condition is important these days as prices have become unreal. :shocked2:
 
Have you been experiencing problems that require knapping often?

My lyman GPR has small flints. I think most commercially available locks have small flints. Small flint striking small frizzens usually means you need to adjust where the flint is in the lock after it has been knapped.

Also, my limited experience in knapping has told me that poor flints are usually not worth the bother. If a flint has lived a good life on its first edge, it's worth reknapping. I also do not hunt with a freshly cut flint. I give it a few shots.

I use the plier pressure method on a chunk of copper in the vise.
 
Thanks to all for the replies so far -- so much to learn!

Which is why I come here! :hatsoff:

Grenadier1758 said:
What rifle or what lock do you have? What size of flint are you knapping?
It's an old Euroarms "Kentuckian" in .44 cal (click for link to old posting) which takes small 5/8" x 3/4" flints.

Years ago, back when I first posted about getting it (or not) for only $220, the consensus here was to either "buy it" or to "run away"...

So I did both! First I bought it, bought a bunch of gear & supplies and worked on a few things to make it more reliable; but then I got away from it for a couple of years...

But I'm back at it now, in a new attempt to make it into an entry-level but reliable flintlock -- AND to make me into a half decent flintlock shooter too.

That's the goal anyway! :thumbsup:

One of these days I'll make a separate posting about everything that's been done to the gun on this journey... It sure has been a frustrating project at times, but I'm not done with all the "fun" yet either...

I have to give credit to my twin brother, Flint62Smoothie, for all the help and encouragement. Thanks bro!

Old No7
 
I have no idea how to use that tool...I would have to play around with it to figure it out...I suggest you do the same, go find a piece of local flint or chert and practice....

Only advice I can give is, if you are sharpening take extremely small "bites".
I swing whatever I am using for a hammer like a sewing machine....up and down at 90 degrees to the edge. I advance slowly barely making contact, and advance along the edge.
Once you gain experience you will learn how to make deliberate strikes.

In the field I use the frizzen to pressure flake sharpen in place...(not the best practice)....Other wise I remove it from the jaws.

My methods work for me but, are probably completely wrong.
 
Like Clyde said:
"....if you are sharpening take extremely small "bites".
Tapping along the edge with a small hammer, or working with a "tool" of any kind to restore your flint...do it lightly and in small increments. It cannot be done in one "whack".
Knapping a flint to restore the edge is one of the skills that comes with time and experience to those who wish to learn. :thumbsup:
 
SK:

I only knew of the tap hammer knapping style, not the pressure kanpping style. A guy can pick up a bunch of good stuff on these forums.

The hammers are simple. I have a square one and the one #7 shows. Very slight taps on the edge starting from one side and working across. If a piece of the flint is protruding, tap it until it is reduced so the edge of the flint is relatively straight. The back of the hammer that is cut diagonally may be for the pressure knapping you guys use. Seems the right angle for it but I haven't tried yet.

I don't see it as an art form. It is simple and lets a guy get full use out of what is now a pretty expensive expendable item, a piece of flint. Never would have imagined a piece of flint costing near $3.00.

Scipio
 
One of my better "retirement" investments was two 100 count bags of Tom Fuller black flints. I have them squirreled away in case the supply dries up entirely.

I use a little "nibbler", or sometimes the spine of a knife, or even the heel of the frizzen to press down and flake a fresh edge.

wEhkatS.jpg
 
I use both methods in point knapping and for final edge work nothing comes close to pressure flaking for edge control and final sharpness.
A flake from bi-face reduction will very often be as sharp as it can be physically made but usually is very thin and not suitable for a gun flint edge as it is not strong and will break off very quickly. Pressure flaking will restore a much stronger, sharp edge with minimal material loss.
The reason is because pressure flaking does not crush the edge as does percussor flaking.
We are taught when knapping to purposely dull and edge before using a percussor to drive off a flake from a prepared platform. The reason is so the impact will travel through the stone and not be cushioned by the thin sharp edge crushing.
The same thing needs to be present when the flint edge hits the frizzen face. The edge needs to be sharp and strong, so it won't crush, for cutting frizzen steel to make sparks. If it has tiny cracks in it from a hammer it will soon break off and be dull again.
Also you will notice that on the corners of the flint it is much easier to leave them sharp and defined with a pointed pressure flaker than with a hammer that usually knocks them off.
Hammers tend to leave tiny fractures in the edge,(even if it does not break off) that a pressure flaker will not.
We knappers start a flint node with a large hammer stone knocking off the cortex ( outer layer) and then larger spawls which are worked down to what is know as a bi-face (worked on two sides)and if for flints worked down to a Core which is reduced to blades which are sectioned in to flints.
The flints usually have a hump on the back when struck from a core, which were the platform edge while still on the core, but I prefer flakes for gun flints as they will have a flat back.
The other advantage to using flakes is that they are usually the debris or left overs from bi-face reduction and made usable for gun flints.
 
A nipper will work but a point with a piece of raw hide under the bottom of the flint edge for support will give you a much better and stronger edge.
 
I did a short video about a year ago on here to show how pressure flaking works.It may be on Utube now for all I know. It will show what I'm talking about and you might as well learn from the get go the best way I know of to sharpen and maintain a gun flint edge.
 
Making a gun flint takes some skill but re-shapening an existing one with a pressure flaker is very easy to learn.
Much easier than trying to fracture an even edge with a hammer. I still can't make as good of an edge on a gun flint with a hammer as with a pressure flaker and I've been knapping points for about five years.
 
There is one more technique used in knapping that can have some use in gun flint edge work. It is known as "shearing" and is accomplished by rolling the side of a pressure flaker against the flint edge.
It basically is a fine crushing technique to straighten up and edge but it also dulls it.
I will use it to level a gun flint edge then pressure fake to sharpen it up.
 
CC:

I know what chert looks like but most certainly don't want to turn a block of it into a couple of flints.

Will spend the money on flints that fit my blasters and tap away on the edges to keep them running as long as they keep working.

Scipio
 
Back
Top