I hope I put this into the right forum and I hope you enjoy these step-by-step instructions.
Many of you have given me great tips and ideas, so I hope this helps some of you and maybe inspires you to make your own ramrod.
I wanted a relatively lightweight 'hollow' brass ramrod to use with my already-weighing-in-at 11-pounds Mowrey Plains Rifle in 50cal that wears a brass forend along with the brass box-lock action. I have a solid brass ramrod made by October Country, and was told they used to make hollow ones ... but I haven't been able to locate one. So I made my own from available parts.
PARTS:

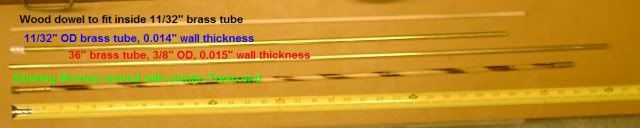
* Treso combo jag/ball puller - $4.75
* 36” length of 3/8” OD brass tube - $5
* 36” length (OPTIONAL) of bras tube [I used 11/32”] that fits snug inside the 3/8” tubing - $4 [You won’t use it all]
* Wood dowel, sized to fit tubing AND the inside of the Treso combo jag housing - $1
* 10-32 threaded brass wood insert - $0.25
* Brass brads (for pin) and gorilla glue, $0 - you MUST keep some on hand") !
!
Total parts price = $15!
CONSTRUCTION:

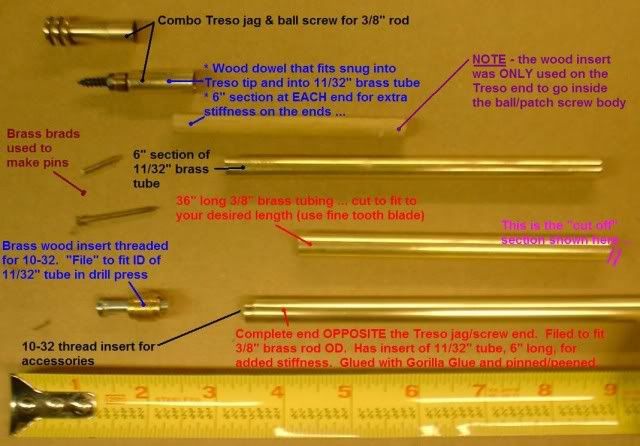
First thing I did was to insert a 10-32 machine screw into my drill press and turned the OD to be just over 3/8” in diameter. Then I removed the bolt and put it thru the insert and filed it to just fit the ID of the brass tubing. (Note, use a 8-32 bolt and sized brass insert if you prefer that accessory hardware size.)
Just turn down the threaded insert to match the ID of the tubing you need, and glue/pin it into place. You will note that I left a 3/32” shoulder on the end of the insert, akin to a replaceable arrow head insert, to give a more solid end to the ramrod.
You see that I also used a 6” piece of the smaller 11/32” OD brass tubing on both ends to add stiffness to that part of the rod. I figure that it where the stress will most likely to be. You could easily just use a wood dowel turned to match your rod ID and the Treso fitting and just leave it there. I dunnoh, whatever works ”¦ but I used the extra piece of smaller tube ”“ worked for me!
TRESO END DETAILS:

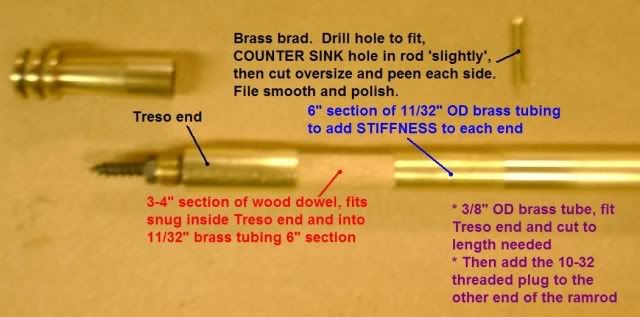
This photo shows the method I used on the combo jag end, where the dowel goes into the jag housing/body, and is a snug fit to the 11/32” brass rod (6” long or so), which is then a snug fit into the full length 3/8” OD brass tubing.
You will note that due to the size wood dowel I needed to fit into the Treso combo jag body, I needed to step up either the dowel to fit the ID of the 3/8” brass tubing or come up with another method. While browsing the excellent hardware section at my local and WELL-stocked Ace hardware store, I found a dowel that just fit into the Treso end, and it would slide into a 11/32” brass tube, which would just slide into the 3/8” brass tube.
COMPLETED ROD:

Once everything was cut and fitted, it was ready to assemble, but I’ll let you in on a little trick first. Take a counter-sink tool and ”˜lightly’ c’sink the hole on each side where the pin will be. Not too much, just enough to form a slight tapered edge to the hole. This gives some area for the pin to be peened into place.
I scratched up the dowel and the tube IDs to give the Gorilla Glue some extra stock to purchase too and I degreased the tubing and insert with Naptha. I applied the glue, assembled it all and left everything to dry overnight. The next day I drilled for the pin holes and peened the ends of the pins over, then filed it all smooth and polished the rod.
Here it is ... shown next to my $60 Mowrey :thumbsup: ... but that’s another story for another day!
Yes, as you can see, it’s a bit longer than the barrel, but I prefer my rods that way. In use it projects about 1.5” forward of the muzzle. It gives me extra room to grab or ”˜purchase’ the rod when needed and I like the idea of the ramrod protecting the muzzle somewhat from wayward whacks and twigs while in the woods.
Not too bad for 30 minutes work and
Many of you have given me great tips and ideas, so I hope this helps some of you and maybe inspires you to make your own ramrod.
I wanted a relatively lightweight 'hollow' brass ramrod to use with my already-weighing-in-at 11-pounds Mowrey Plains Rifle in 50cal that wears a brass forend along with the brass box-lock action. I have a solid brass ramrod made by October Country, and was told they used to make hollow ones ... but I haven't been able to locate one. So I made my own from available parts.
PARTS:
* Treso combo jag/ball puller - $4.75
* 36” length of 3/8” OD brass tube - $5
* 36” length (OPTIONAL) of bras tube [I used 11/32”] that fits snug inside the 3/8” tubing - $4 [You won’t use it all]
* Wood dowel, sized to fit tubing AND the inside of the Treso combo jag housing - $1
* 10-32 threaded brass wood insert - $0.25
* Brass brads (for pin) and gorilla glue, $0 - you MUST keep some on hand
!Total parts price = $15!
CONSTRUCTION:
First thing I did was to insert a 10-32 machine screw into my drill press and turned the OD to be just over 3/8” in diameter. Then I removed the bolt and put it thru the insert and filed it to just fit the ID of the brass tubing. (Note, use a 8-32 bolt and sized brass insert if you prefer that accessory hardware size.)
Just turn down the threaded insert to match the ID of the tubing you need, and glue/pin it into place. You will note that I left a 3/32” shoulder on the end of the insert, akin to a replaceable arrow head insert, to give a more solid end to the ramrod.
You see that I also used a 6” piece of the smaller 11/32” OD brass tubing on both ends to add stiffness to that part of the rod. I figure that it where the stress will most likely to be. You could easily just use a wood dowel turned to match your rod ID and the Treso fitting and just leave it there. I dunnoh, whatever works ”¦ but I used the extra piece of smaller tube ”“ worked for me!
TRESO END DETAILS:
This photo shows the method I used on the combo jag end, where the dowel goes into the jag housing/body, and is a snug fit to the 11/32” brass rod (6” long or so), which is then a snug fit into the full length 3/8” OD brass tubing.
You will note that due to the size wood dowel I needed to fit into the Treso combo jag body, I needed to step up either the dowel to fit the ID of the 3/8” brass tubing or come up with another method. While browsing the excellent hardware section at my local and WELL-stocked Ace hardware store, I found a dowel that just fit into the Treso end, and it would slide into a 11/32” brass tube, which would just slide into the 3/8” brass tube.
COMPLETED ROD:
Once everything was cut and fitted, it was ready to assemble, but I’ll let you in on a little trick first. Take a counter-sink tool and ”˜lightly’ c’sink the hole on each side where the pin will be. Not too much, just enough to form a slight tapered edge to the hole. This gives some area for the pin to be peened into place.
I scratched up the dowel and the tube IDs to give the Gorilla Glue some extra stock to purchase too and I degreased the tubing and insert with Naptha. I applied the glue, assembled it all and left everything to dry overnight. The next day I drilled for the pin holes and peened the ends of the pins over, then filed it all smooth and polished the rod.
Here it is ... shown next to my $60 Mowrey :thumbsup: ... but that’s another story for another day!
Yes, as you can see, it’s a bit longer than the barrel, but I prefer my rods that way. In use it projects about 1.5” forward of the muzzle. It gives me extra room to grab or ”˜purchase’ the rod when needed and I like the idea of the ramrod protecting the muzzle somewhat from wayward whacks and twigs while in the woods.
Not too bad for 30 minutes work and