• This community needs YOUR help today. We rely 100% on Supporting Memberships to fund our efforts. With the ever increasing fees of everything, we need help. We need more Supporting Members, today. Please invest back into this community. I will ship a few decals too in addition to all the account perks you get.


    Sign up here: https://www.muzzleloadingforum.com/account/upgrades
  • Friends, our 2nd Amendment rights are always under attack and the NRA has been a constant for decades in helping fight that fight.

    We have partnered with the NRA to offer you a discount on membership and Muzzleloading Forum gets a small percentage too of each membership, so you are supporting both the NRA and us.

    Use this link to sign up please; https://membership.nra.org/recruiters/join/XR045103

Bookie's Wheellock Project

Muzzleloading Forum

Help Support Muzzleloading Forum:

This site may earn a commission from merchant affiliate links, including eBay, Amazon, and others.

Bookie

40 Cal.
Joined
Mar 13, 2005
Messages
346
Reaction score
1
Location
Corn Patch, Iowa
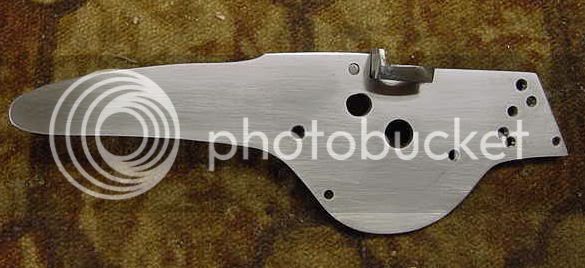
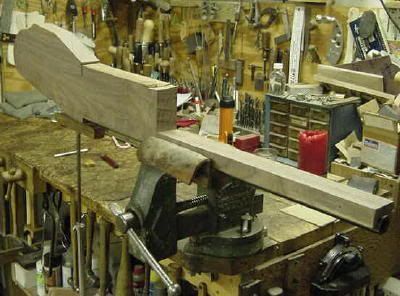
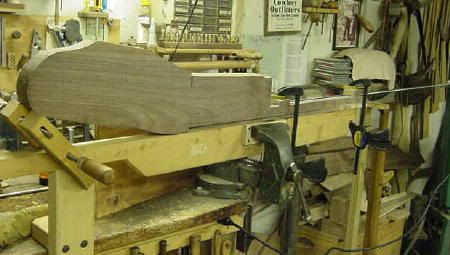
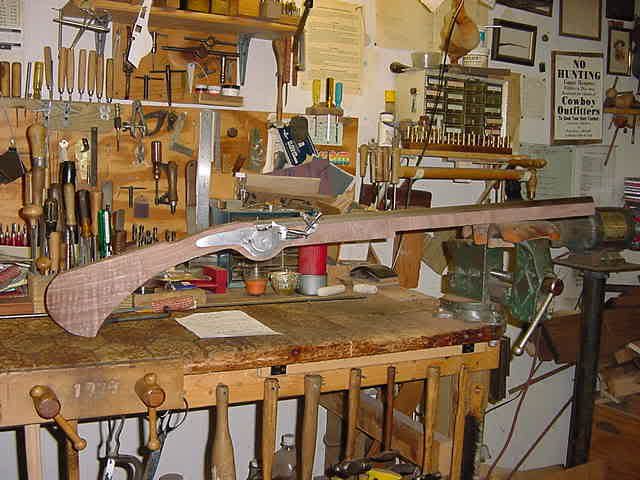
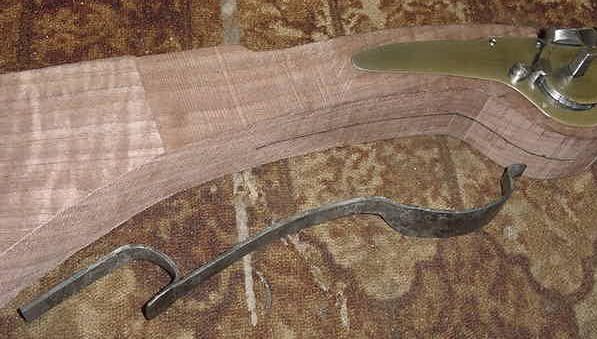
The wheelie is finally getting underway. 1st Photo: The lock plate has been remodified at the upper rear portion of the tail to more resemble the original. The .62 cal. barrel is inlet and pinned, but the front 3/5ths still needs to be turned 1/2 round. The ramrod channel is carved and the hole drilled. The butt is half way profiled and you can see the round shape. 2nd Photo: Is the forearm being laid out so I can carve the ramrod channel. 3rd Photo: The stock is in my ramrod hole drilling fixture. Look closely and you can male out the 4 foot drill bit in place. The wood is STRIPED native Iowa walnut. The original that I am "copying" is a Dutch military carbine. Since my barrel is longer, the weapon will be a smooth rifle. Hope you enjoy the pics. Bookie
RemodifiedLockPlate.jpg

ForearmCutDown.jpg

StockInRamrodHoleJig.jpg
 
Spitfire, I started inletting the lock today. It requires quite a bit of thought before starting as the internals are more numerous and much more complicated than a "standard" front action lock. The lock's guts will wrap around part of the barrel and breech plug as it seems because of the very close proximity of it all. (A bit daunting for this fat boy!) Will post another photo when I get the lock in. The next major issue will be which type of trigger to use and then how in the Sam Hill to get it installed. Cheers, Bookie
 
Here's the latest photo of the project. The lock was pretty tricky to inlet--particularly the curved front of the sear. (Glad I don't do this for a living.) Thought I had it complete, but then I put the barrel in the stock and....uh-ohh. Had to go and relieve the breech plug a tad for that pesky sear. Must have taken me about 5 hours to inlet the rascal, but at least it can be fully spanned and not rub or break any wood! GUNMAKER'S TIP: It's all in how you hold your tounge while inletting. Got the excess belly wood removed. Hope to slab down the sides tomorrow. Bookie
RoughShaped.jpg
 
Very nice. That is a very pretty piece of wood, I like the bit ofcurl in the butstock, that is always a nice feature in a piece of walnut.
 
Bookie,
It's gonna be gorgeous! We should get together for a wheellock shoot. Maybe at Fiddlestick's place in Toad Suck, Haw Haw!
YHWH bless.
volatpluvia
 
It is not the speed of doing the job,but skill that increases with time with a job well done.Nice photo. :winking:
 
It's my intention of using this wheelie for Spring turkey hunting this year. (Figger if Leon can shoot them raindeers, I oughtta be able to hit one of them fat woodchickens. :grin: ) With that thought, I made the ramrod tip similar to one found on a shotgun. It's .56 cal in diameter and flat-faced for the wads.
10RamrodTip.jpg
 
Hi Jim! A mainspring slaved to the tumbler via a chain causes the wheel to turn--after you have spanned it in order to place tension on the system. Here is a photo of my lock from a few months ago. It is the only one I have ever built and with no instructions, it took about 8 months--IF I remember correctly. :haha:
FinishedWheelieRear.jpg
 
i see how the wheel spinsbut how does it spark i heard thats not a flint but pyrite is it just friction from the wheel spinning i am confused theres a nice kit pistol at rifle shoppe i would nevertry to build that lock
 
Gentlemen, The lock is a TRS kit that I assembled and modified as you see in the photo and which I have since further modified. The pyrite or "Fool's Gold", ignites the powder from the sparks caused from the pyrite striking the spinning wheel. The spinning wheel has grooves and notches in it's surface which remove bits of pyrite through friction. The heat generated from the friction causes the tiny bits of pyrite to incandess/ingnite/"spark". The sparks hit the powder and ignites it. Wire Grass area of Alabama?? I took chopper school at Ft. Rucker and lived in Ozark. Cheers, Bookie
 
Forge welded the 1 piece trigger guard today out in the blacksmith shop. Used a piece of 1/4" X 1/2" hot rolled steel. Here is a pic for your consideration. Cheers, Bookie
10TriggerGuard.jpg
 
Jim, a spanner is the old and proper name for a wrench. I.E. a "Cresent wrench" is really an adjustable spanner. :thumbsup: A spanner is the wrench that fits on the tumbler axle (which fits through the wheel) ands once it's in place, you rotate the wrench to put the tension on the mainspring. Bookie
 
I live close enough to Kairns AAF that I can hear dustoff and any alerts!Not a problem since I am a son of a Navy Airdale Bookie! :winking:
 
The spanner was the key used to "span" a wheel lock. You couldn't cock them because they predate cocks :thumbsup:
 
Back
Top