• This community needs YOUR help today. We rely 100% on Supporting Memberships to fund our efforts. With the ever increasing fees of everything, we need help. We need more Supporting Members, today. Please invest back into this community. I will ship a few decals too in addition to all the account perks you get.


    Sign up here: https://www.muzzleloadingforum.com/account/upgrades
  • Friends, our 2nd Amendment rights are always under attack and the NRA has been a constant for decades in helping fight that fight.

    We have partnered with the NRA to offer you a discount on membership and Muzzleloading Forum gets a small percentage too of each membership, so you are supporting both the NRA and us.

    Use this link to sign up please; https://membership.nra.org/recruiters/join/XR045103

Installing brass tacks.

Muzzleloading Forum

Help Support Muzzleloading Forum:

This site may earn a commission from merchant affiliate links, including eBay, Amazon, and others.

squib load

40 Cal.
Joined
Aug 5, 2006
Messages
403
Reaction score
0
Hi,does anyone know a better way to put the tacks in without brading them?I drilled the leather and pushed the tack through and cut the stem off at the leather.I laid it on my drillpress vice and tried to brad it.Iam no good at brading.Do you know of a better way?squib I havenot trimed the edges yet.
BRASSTACKS018.jpg
 
That looks pretty good to me. :thumbsup: I would maybe try some super glue. Scuff up the shanks and glue the tacks into the leather. That might work. Certainly worth a try. :idunno:
 
Hmmmph. Exposing my ignorance and lack of schooling, I never realized they were tacks. I've always used either double cap or rapid rivets, picking the size that suits my leather thickness. Here are the extra small brass ones from Tandy. If you're not put off by the idea, noodle around their site for different sizes of double caps, as well as rapids (hollow on the back side).

Live and learn. Thanks for the education, I think! :shake:
 
My understanding is that the shank was bent over rather than being cut off...
 
While some were bent over the majority of originals from all periods I've seen (several hundred peices at least) by far were trimmed off and peened over.

To do it properly it is best/easiest to have a piece of brass flatstock say 2-3" wide by 3/4-1" thick by at least 8" long (the wider and longer the better) to use as an anvil, a double thick piece of the rubber poundo board or similar, a light weight ball pein hammer, and a pair of end cutters ground so that the face is flat.
Lay out your pattern - I just sketch the lines in with either a red mini ball pen or a soft lead pencil. For spacing I put in a few of the major points and then eye ball to fill in the pattern.
Once the pattern is layed out use a leather awl to start the hole - BTW the leather needs to be a GOOD grade of veg tan and although I have used thinner I recommend it be least harness weight, 8/10 or 10/12 oz with a nice tight grain. Drive in three of four tacks at a time and then turn the piece over with the heads on your brass "anvil" - the anvil should be mounted on a heavy piece of wood or layed over a nice firm piece of poundo board. This cuts down on noise and also keeps it in place. Take your end cutters and clip the shank off flush with the surface of the leather. Then using the flat face of the hammer tap LIGHTLY on the shank until you flatten out the center ridge left by the cutters. Then using the ball end tap a few times to flare the end of the shank and drive it slightly below the surface. Run your hand over the piece and make sure the shank is not poking out. Turn the piece over and make sure the tack heads feel solid - no matter how careful you are some shanks will want to bend side wise - if they do yank em out and do it over. Still no matter what over time and with much uses some tacks will pop out - most original pieces are missing a few tacks here and there so it just makes the piece more authentic!
This sounds more complicated than it is and it goes pretty fast once you get the rhythm - but on the belts there can be between 400-600 tacks depending on the size so no matter what it is time consuming.

Personally I am starting to use the solid brass tacks for this type, not only is more historically documented for this type work, from what info I have garnered steel shank tacks weren't used until some time around 1870 or so, and even after that the solid brass was the most used. They are expensive but well worth the extra cost.

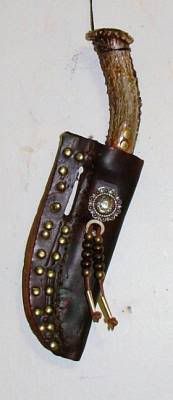
Also lost tacks are common on tacked leather goods, see the original in the first pic on the left, which, to me, implies that they were not normally bent/clinched (pulling a clinched tack out usually tears the manure out of the leather). In most cases the sheaths I examined were also glued using some form of hide glue.
Again in my experience when using tacks the leather needs to be good and firm - soft leather just doesn't cut it . The solid brass square shank tacks are also much grippier than the smooth steel ones.

Here's an original using solid brass (shank and head) square shank tacks, - (they are still available from www.thetrunkshoppe.com - not cheap but the only source I've been able to find for them and for the so inclined the only historically documented tack for pre-1870 usage):
page-29.jpg


And here's one of mine - an 1870's model - using the commonly available steel shank/solid brass head tacks (which historically can be dated to the early 1870's and later)
pt-003.jpg


and here's the front side........
pt-002.jpg


Notes on Usage: In general terms brass tacks were used sparingly pre-1850 (as compared to the later periods when they often literally covered belts and other gear). Therefore the cost isn't as critical if one chooses to use the cast/square shank tacks.

Steel vs brass shanks: The best data I have is that steel shank tacks didn't appear until the 1870's - see the 1878 note above and a steel shank tack was found at Adobe Walls, TX with a date of 1874.

Currently the ONLY supplier of solid cast brass (actually bronze), square shank tacks is the Trunk Shoppe www.thetrunkshoppe.com. They are not cheap - starting price is $0.45 each - but they are well worth it when one wants to be historically correct to the nth degree. A word of caution: the cast tacks are SOFT - so one must pre-drill (I use an awl and punch a hole). The rough square shanks hold very well.

On the other hand the steel shank are much less expensive and are generally accepted at most events without raising eyebrows.
 
Last edited by a moderator:
FYI, you can get a quality pair of flush cutters at bead stores. They do a great job when inlaying wire, also.
 
Good note Mike - I've picked so many old leatherworking pairs at garage sales etc.that I just grind them to what I need....
 
Squib, Years ago, I made several tacked items using the steel shanked tacks. I just would put them in a shallow metal tray, like a small cookie sheet and add just enough water to JUST COVER THE BRASS HEADS!...Then take a propane torch and heat the steel shafts of the tacks red. Let them cool and they are anealed so the shafts easily bend. All now you have to do is push them through your pre-punched holes of the leather. Take a small pair of needle-nosed pliers and bend the shafts back into the leather and give them a tap of a small ball-peen hammer to flush them into the leather......I don't think I ever lost a tack doing it this way!

Rick
 
horner75 said:
Squib, Years ago, I made several tacked items using the steel shanked tacks. I just would put them in a shallow metal tray, like a small cookie sheet and add just enough water to JUST COVER THE BRASS HEADS!...Then take a propane torch and heat the steel shafts of the tacks red. Let them cool and they are anealed so the shafts easily bend. All now you have to do is push them through your pre-punched holes of the leather. Take a small pair of needle-nosed pliers and bend the shafts back into the leather and give them a tap of a small ball-peen hammer to flush them into the leather......I don't think I ever lost a tack doing it this way!

Rick

You must have been a boat builder in your previous life. That method "Clinching" I believe was used by ship rights when double planking the hulls of boats..
Great Idea.. :thumbsup:
Twice.
 
Thanks for the replies,I learned what I wanted to know about tacks.I like the idea about all brass tacks and I never would have thought about anealing them.squib
 
Nothing like Google to lead me right back home. Great idea on annealing the steel shanks!
Labonte, I found your information on a couple of forums. I'll get some solid brass tacks coming from the Trunk Shoppe.
 
Squib

Just bend or "clinch" the ends over. Clinching was common practice in the old days.

Often, blacksmiths and ship carpenters would clinch the nails so the wedge points were perpendicular to the wood grain. The grain was aid to spring back against the body of the nail and help hold it.

Clinching was not considered bad workmanship, if done properly
 

Latest posts

Back
Top