• This community needs YOUR help today. We rely 100% on Supporting Memberships to fund our efforts. With the ever increasing fees of everything, we need help. We need more Supporting Members, today. Please invest back into this community. I will ship a few decals too in addition to all the account perks you get.


    Sign up here: https://www.muzzleloadingforum.com/account/upgrades
  • Friends, our 2nd Amendment rights are always under attack and the NRA has been a constant for decades in helping fight that fight.

    We have partnered with the NRA to offer you a discount on membership and Muzzleloading Forum gets a small percentage too of each membership, so you are supporting both the NRA and us.

    Use this link to sign up please; https://membership.nra.org/recruiters/join/XR045103

Pattern 1730 Brown Bess almost ready for inspection

Muzzleloading Forum

Help Support Muzzleloading Forum:

This site may earn a commission from merchant affiliate links, including eBay, Amazon, and others.
Joined
Nov 26, 2005
Messages
5,010
Reaction score
9,945
Hi,
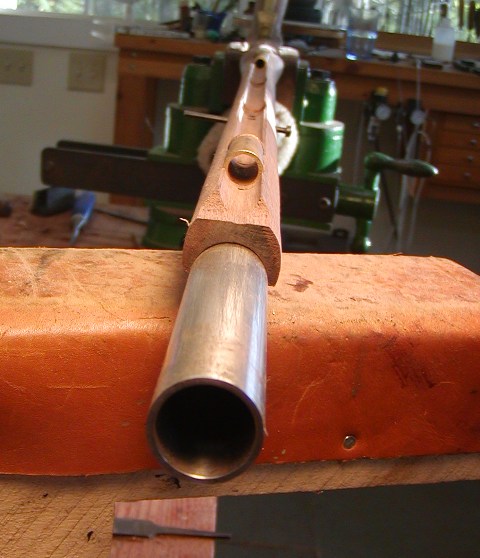
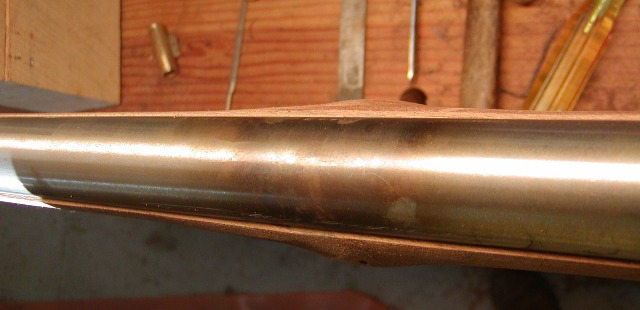
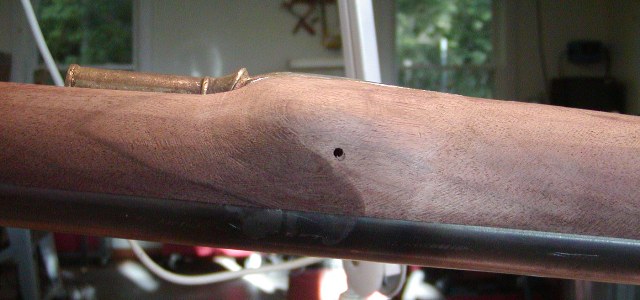
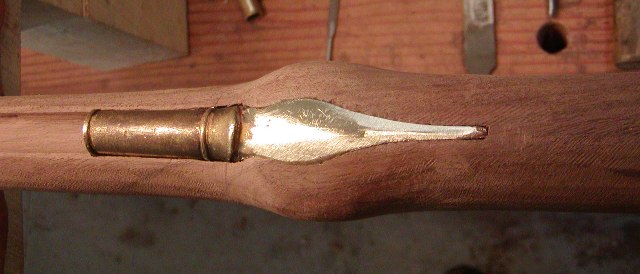
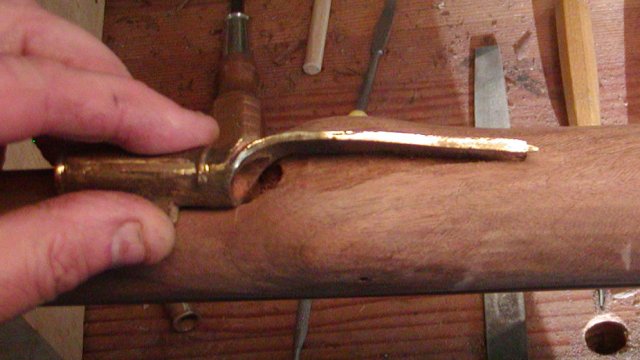
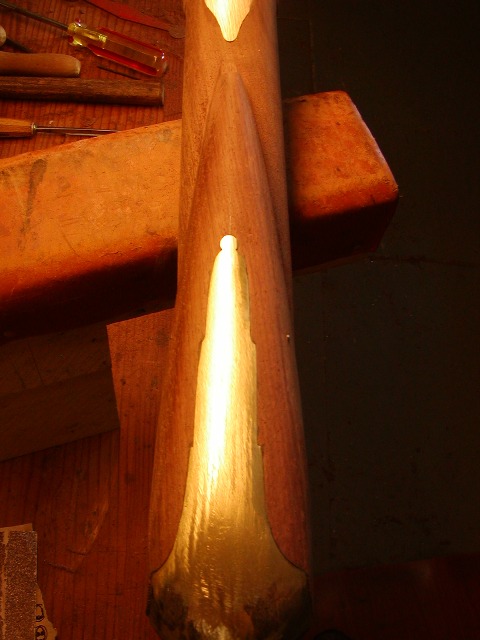
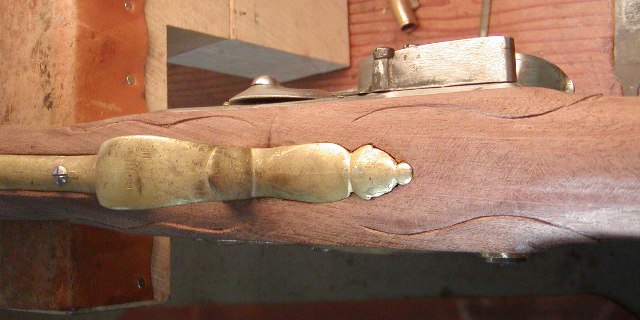
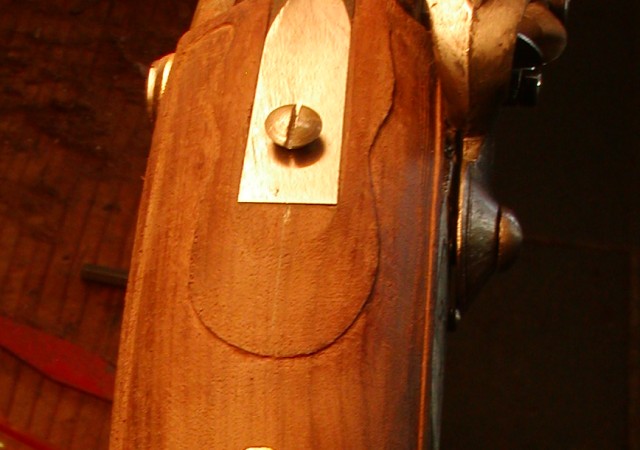
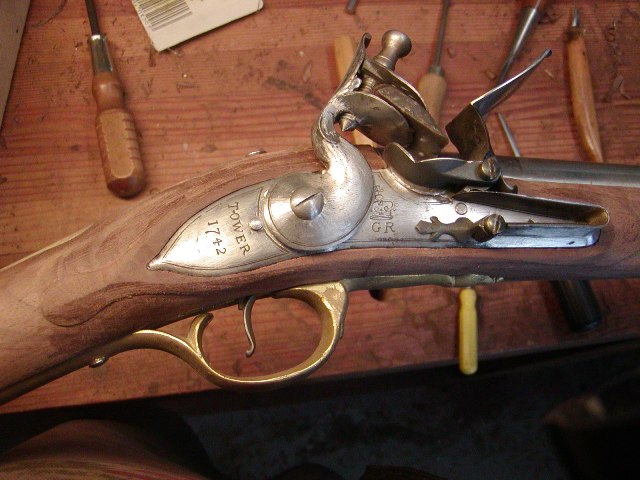
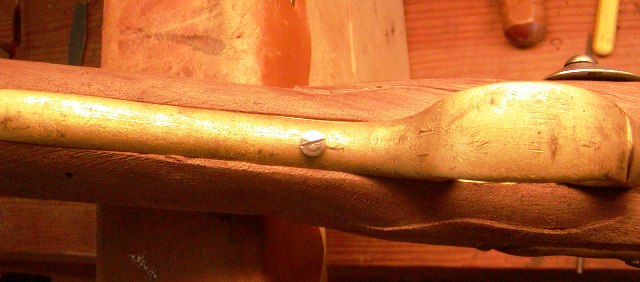
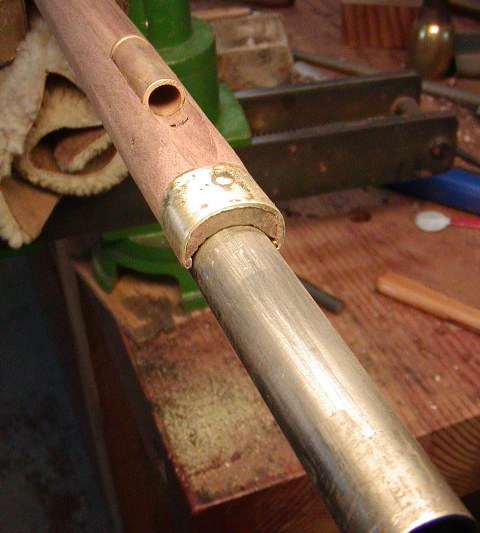
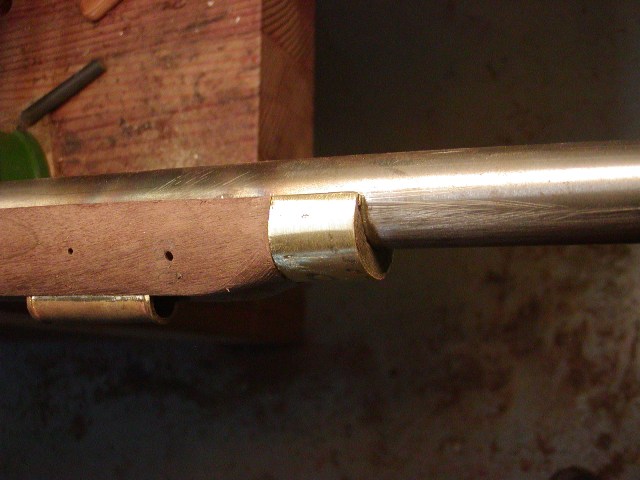
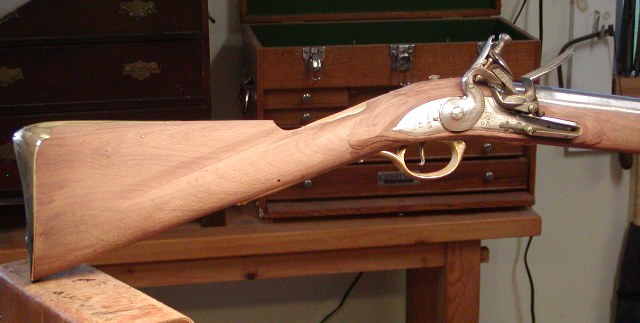
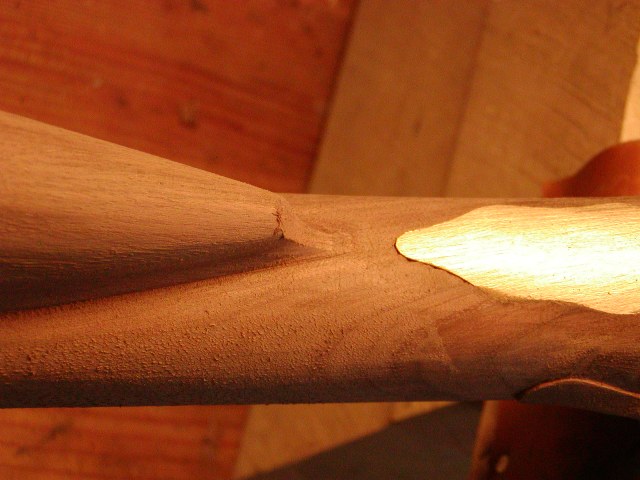
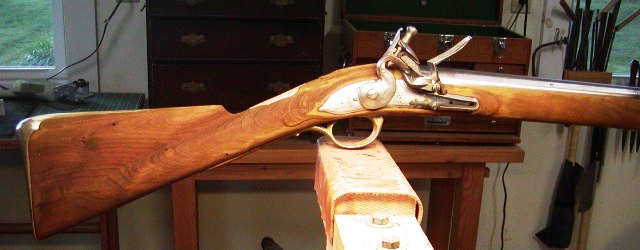
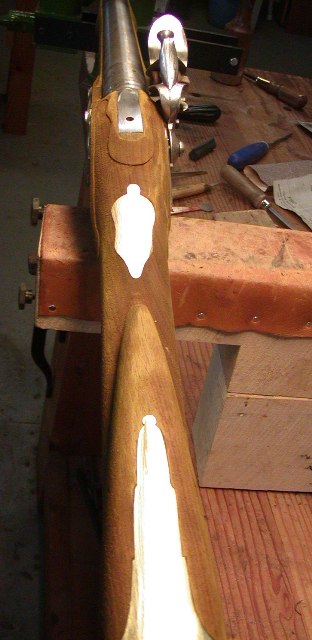
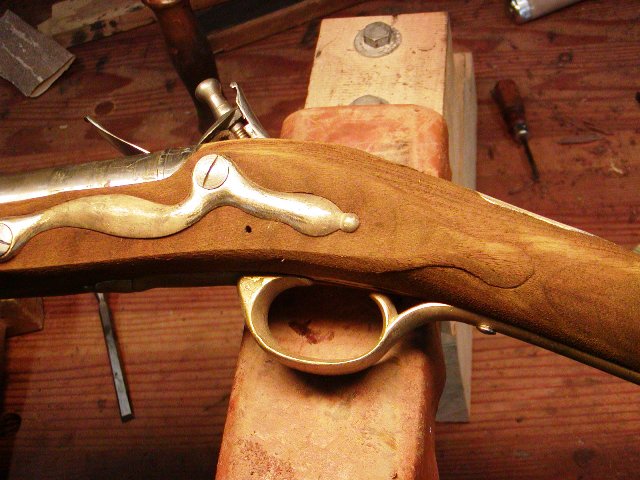
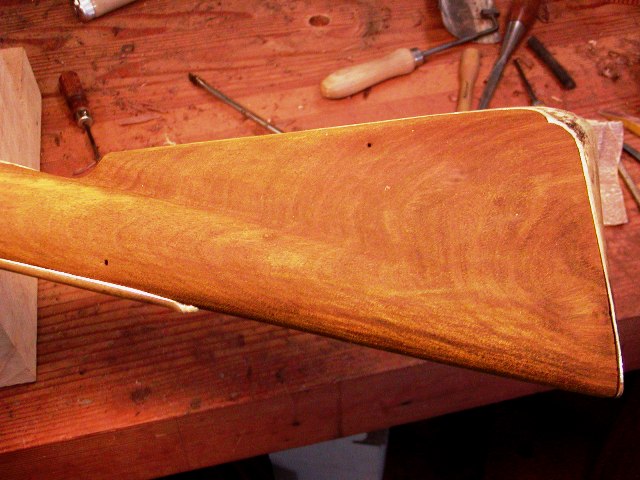
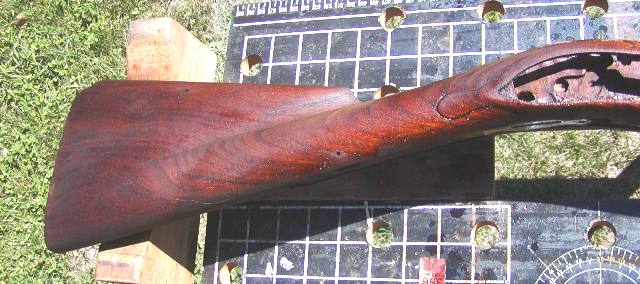
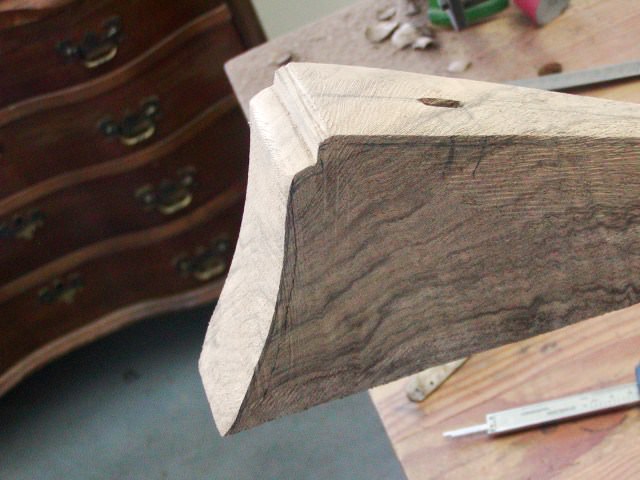
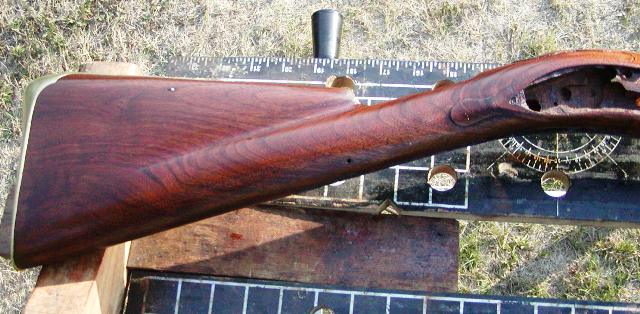
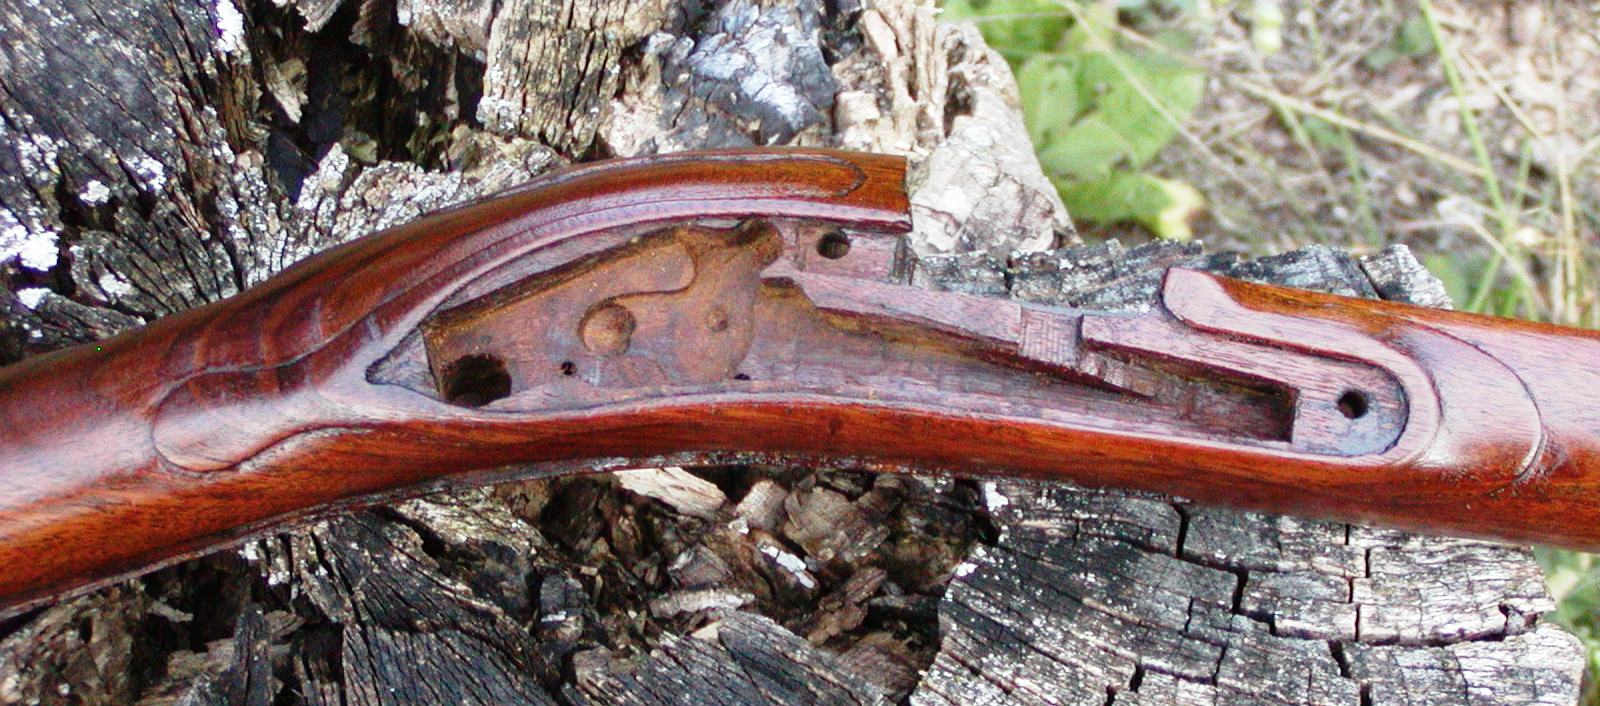
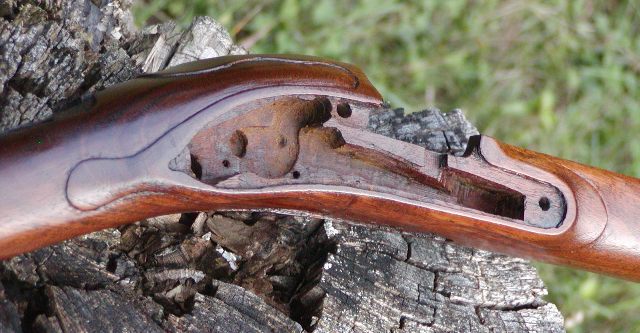
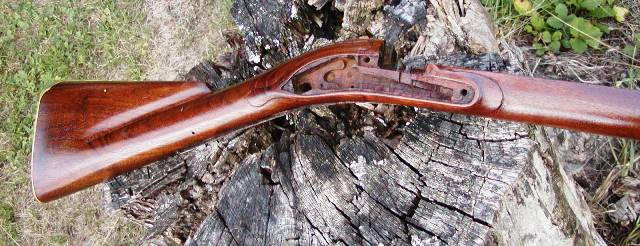
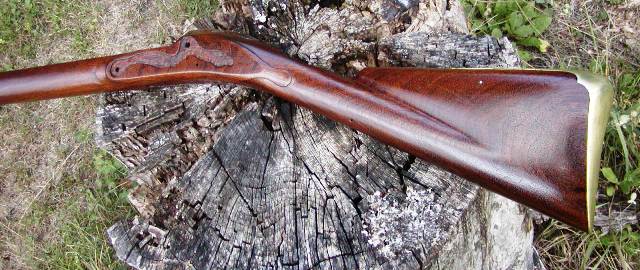
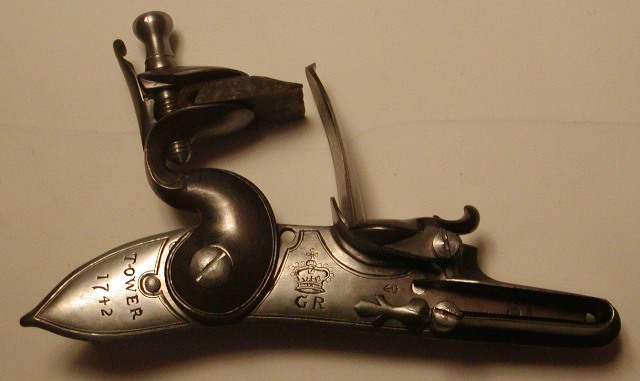
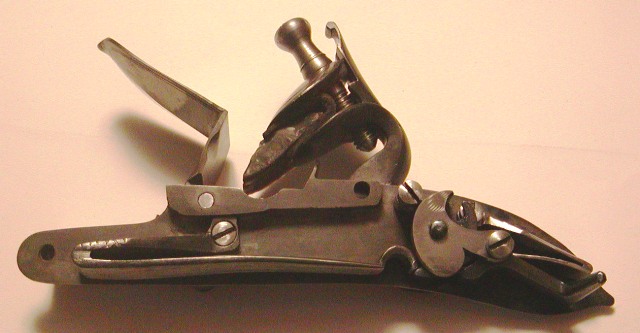
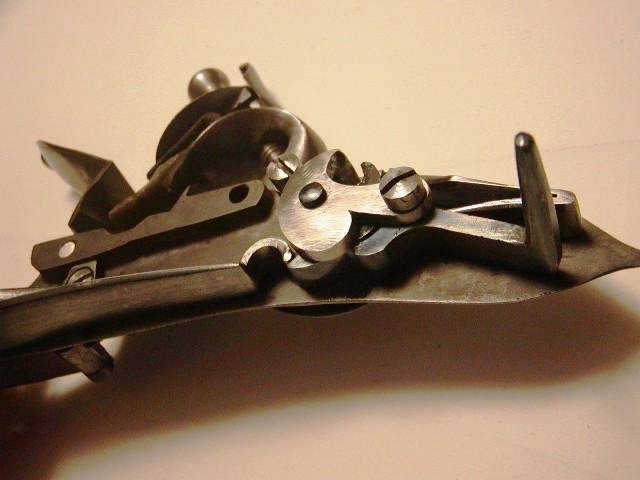
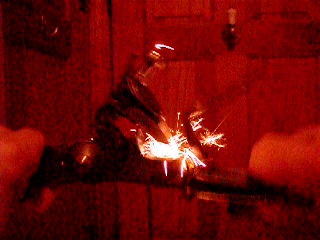
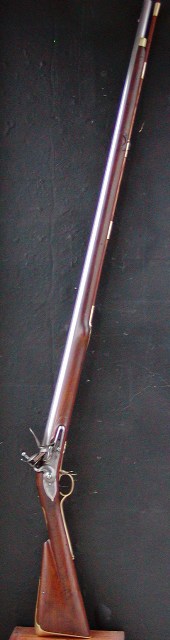
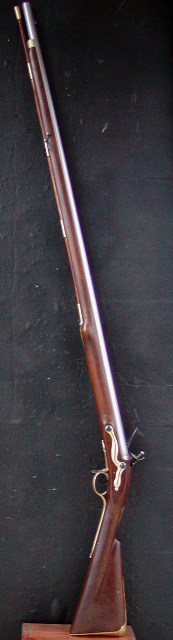
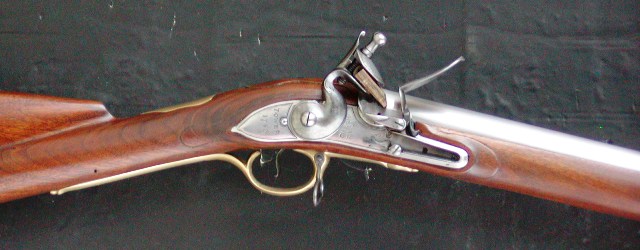
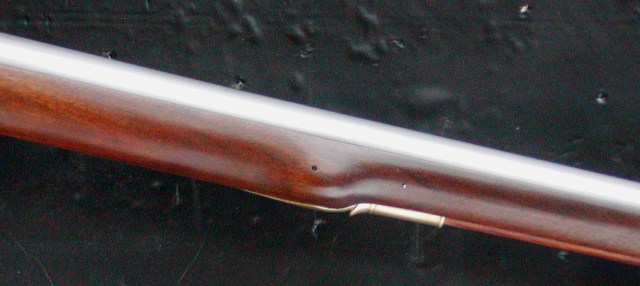
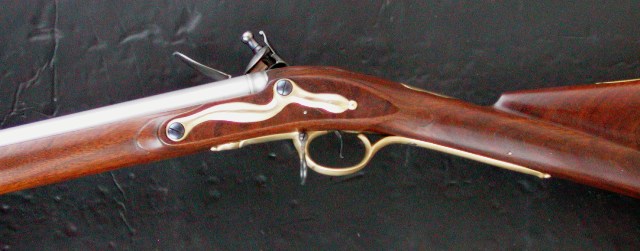
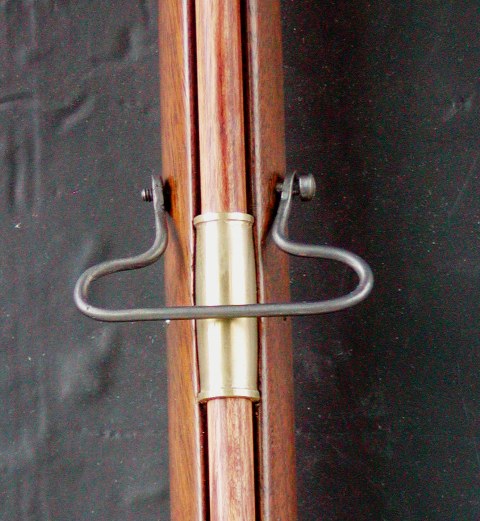
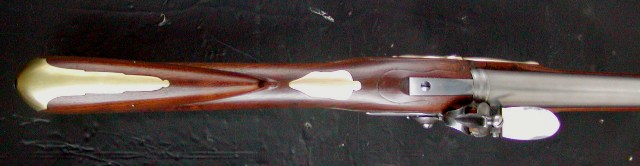
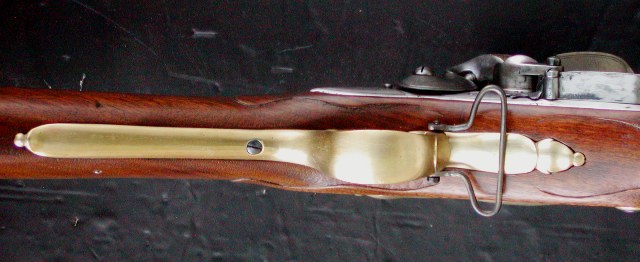
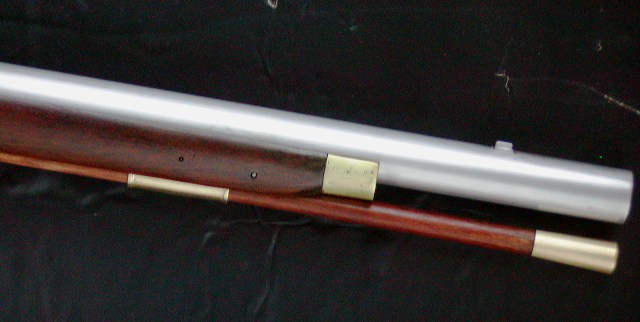
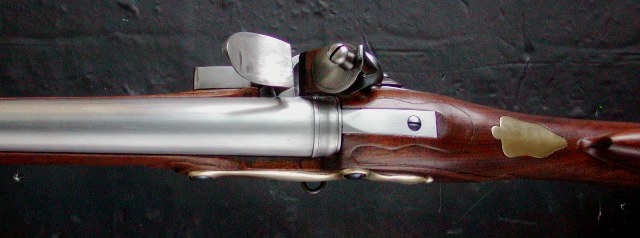
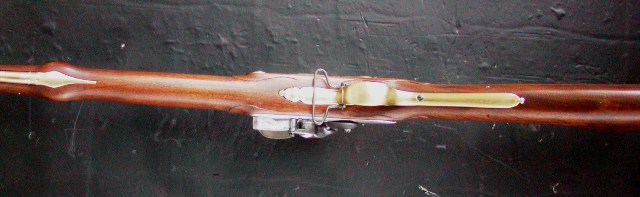
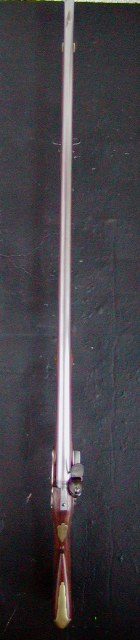
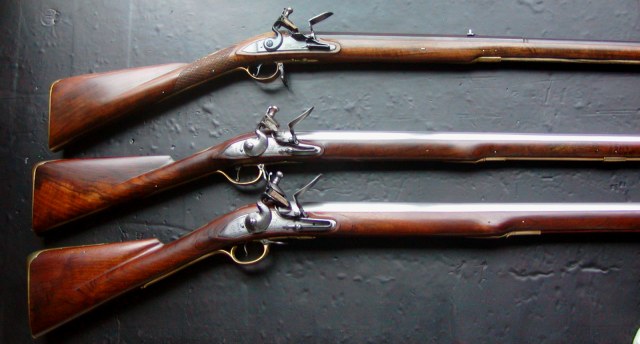
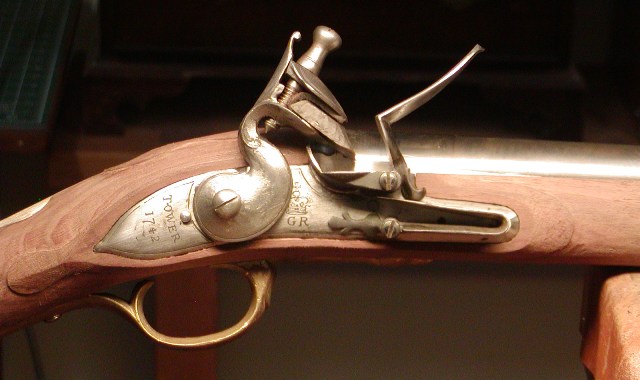
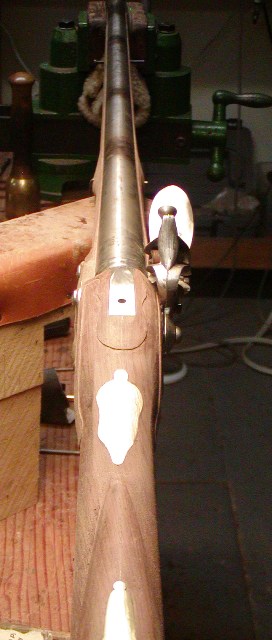
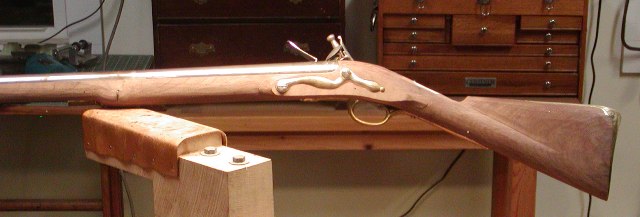
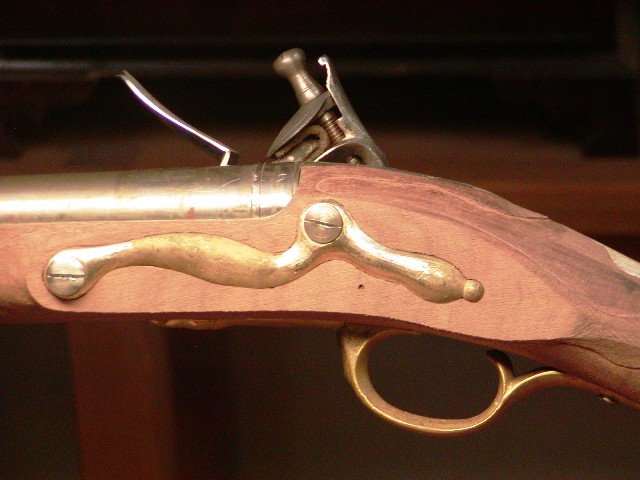
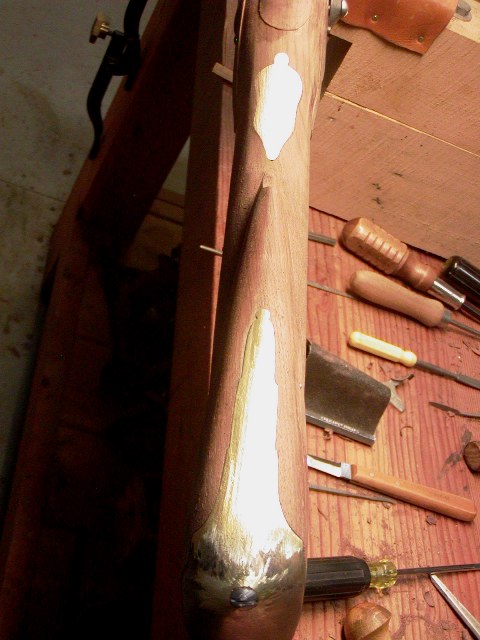
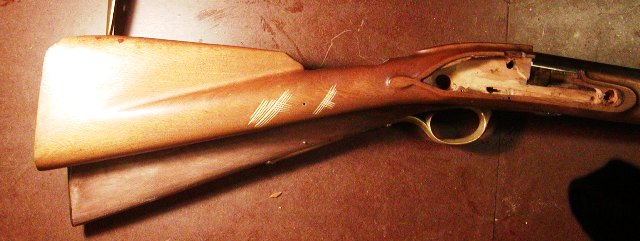
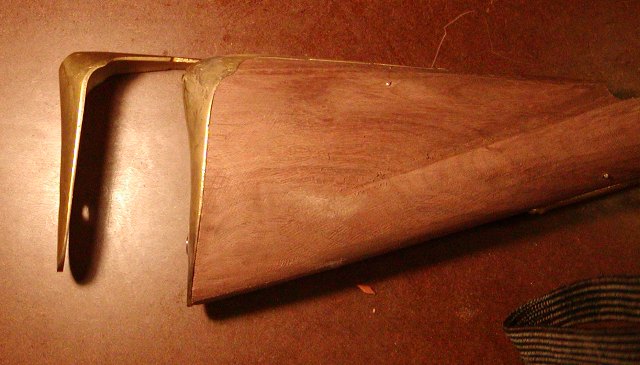
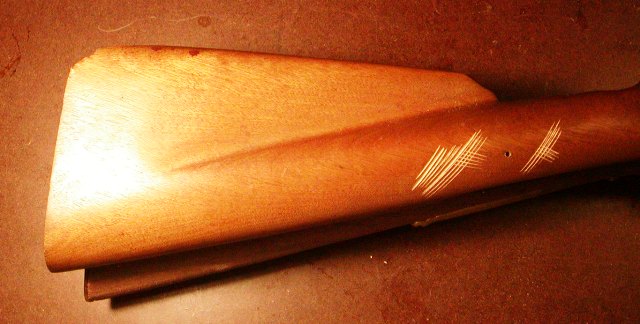
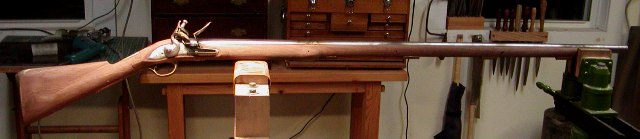
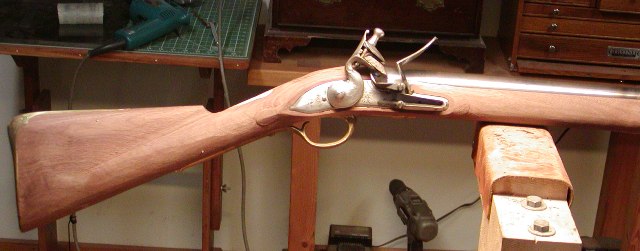
Been working on this for a while along with 3 other projects. It is a British pattern 1730 long land Brown Bess musket upgraded with double bridled lock, stronger trigger guard, and brass nose band. Those upgrades started being made very soon after the musket was first issued. I still have to finish shaping the stock including the butt and lock area as well as removing even more wood along the forearm. There are many details to attend. For example, note the lock and side panels dip down along with the shape of the lock at the tail. The bottom edge should actually be fairly straight so the dip will be removed and the edge of the lock at that point will come almost to the edge of the molding. The flat around the lock will virtually disappear. The lock still sits a little deep so the wood has to be filed flush with the edge. The swell at the rear ramrod pipe needs to be made more ball-like. I have to add the nose band and pin the trigger in place. Then the black walnut stock will be final filed and scraped, no sandpaper and the finished surface will still have a few tool marks. I'll stain the stock yellow to warm up the black walnut, then alkanet root stain to give it a bit more red. Finally, Sutherland-Welles polymerized tung oil wiping varnish. I included some photos showing a Miroku Bess stock along with this one. Note how straight the Miroku is and how short the butt plate. It is 4.75", which is 3/8" to 9/16" too short even for a short land pattern Bess and it makes a huge difference in the architecture of the gun. The Pedersoli Bess has the same problem. The early pattern Bess is the best shooter because it has the most drop in the stock and it is one of the lightest versions of the long land musket. Mine will weigh 9 lbs.

dave
xs3CAvT.jpg

FkXZApH.jpg

dij8vha.jpg

NnNtYYG.jpg

9m9Z6OH.jpg

HX5911C.jpg

UX3RqI0.jpg

NrPqGnS.jpg

Ygcar3G.jpg

Ilft8kf.jpg
 
Hi,
Got more done but I also wanted to highlight some details that may help those of you building or planning to build a Brown Bess. I thinned the fore stock more and installed the trigger. I have not adjusted it yet and that brings up the first topic. The Bess lock has no fly in the tumbler and a very light trigger pull may not be sufficient to keep the sear from catching in the half cock notch when the gun is fired. The original muskets had heavy trigger triggers but most modern shooters want something lighter. If the gun is used in reenactments, minimum trigger pull may be regulated often at 3 lbs. Currently, the pull on this musket is barely a pound because the trigger bar is lifting the sear. I have to file it down a little at a time to get it where I want it to be at about 2.5 o 3 lbs. At the current light pull, the lock hangs up at half cock when fired about 50% of the time. I've reworked many Pedersoli Besses that the owners had lightened the trigger pull and I usually find evidence of wear on the lip of the half cock notch because the sear is mashing it but not enough to slide into the notch. The bottom line, is there is a limit to how light trigger pull can be made on a lock with no fly detent in the tumbler. The photo below shows the lock and trigger, and how low the lock sits in the stock. There is not much wood below the edge of the lock and consequently, the trigger bar is not very high. The trigger is pinned about midway between "E" and "4" engraved on the lock.
lckvYKf.jpg

The sear of the lock is located left and below the engraved "2". So you can see that the trigger bar is pretty low relative to the lock but is pinned high giving good leverage. The flats around the lock in the photo will basically disappear when I am done. I will file that flat right up to the edge of the lock and then give the lock panel a swipe or 2 of sand paper backed by a flat block of wood to establish barely visible flats around the lock.
I thinned the forestock. The stocks on original Besses were not bulky. They were pretty trim and the early pattern was slimmest.
3TCiq01.jpg

9Xj1qOG.jpg

I believe some folks have trouble with the swell at the rear ramrod pipe. The first thing to understand is that the swell is horizontal, not vertical as well. There should be almost no perceptible swell downward when looking at the stock from the side.
wkjH0p4.jpg

On the early Besses, the swell was more ball like.
nXZIeHD.jpg

Later it became slimmer and more oval. Rear pipes on Besses had a little point of hook cast into their ends that hooked under the surface of the wood holding the rear of the pipe tang in place.
BSvqB3n.jpg

The early Besses had butt stocks that were much more bulbous that later patterns.
NhTFhAF.jpg

In addition, the comb swelled slightly wider at the top increasing the heavy appearance of the butt stock. Finally, the earliest patterns had attractive and wavy lock panel and barrel tang carving. On the bottom, the pattern faded away in the middle but on top it extended to connect with the barrel tang carving. The apron around the barrel tang had a concave contour.
mRe4D6n.jpg

Hi2g2Od.jpg


More to come.

dave
 
Hi,
Got more done on the Bess and other projects. My friends, Harley and Ernie surprised me today. They are retired Vermont farmers and avid, and really good, muzzleloader shooters. We sat on my shop porch, talked guns and looked at the view. Life is very good.
qSRpSqI.jpg

WKgFZ8K.jpg

I adjusted the trigger but I need to tune the lock to finish the job. With the big frizzen, massive flint, long throw, and strong springs, the lock should always fire no matter how dirty or dull the flint.
DIrp7Kn.jpg

Also, I wanted to show the screw that anchors the wrist plate. It goes through the wrist and anchors the trigger guard, rear of the trigger plate, and wrist plate.
3I3dvhC.jpg

I made and installed the nose band. This is an example of the historical details that make this stuff so much fun. The pattern 1730 musket was first issued with no nose cap or nose band. Very quickly, regimental armorers realized the potential for the stock to split and retrofitted nose bands. There were no recorded specs for the bands and it seems to have been left up to the individual armorers. Some bands had closed ends and many were left open, as I did on this one. I first file the stock to create the form for the band, then use card board to fit and create a template. I cut 0.04" thick brass to fit the template and anneal it. Then I bend it to fit the stock and pinch over the top edges to lock it in place. Finally, I drill the stock and band for a small flat headed brass wood screw, counter sink both sides of the hole and install the screw. I cut off most of the excess screw on the outside of the band and put the barrel in place to act as an anvil. Then I peen over the excess screw on the out side creating a very strong rivet. The nose band is neat and strong.
RLyVcEg.jpg

rYBckrn.jpg

I worked on final shaping the butt stock and defining the baluster wrist. The top of the comb swells a little and the wrist is defined by a sharp crease.
NAg3WAB.jpg

The front of the comb is blunt and fairly wid on these early Besses.
LpEsdOS.jpg


More later,

dave
 
Hi,
I devoted just one 8-hour day to final finishing the stock sufficient for the first coat of yellow stain. After all the details were cut and shaped, I finish filed and scraped the stock. I used 80-grit sandpaper in a few places where the grain of the black walnut made it a nightmare to scrape. If it was English walnut, that likely would not be an issue but certain spots on this stock of black walnut really tear and chip regardless of which way I cut. In truth, I am no fan of black walnut and use it only when my objectives require it or if I have no other choice as in this case. English walnut blanks long enough for a long land Bess are rare and very expensive so I went with black walnut. The BW blank was very hard and dense but still inferior to English walnut. Anyway, I got the job done and applied my first coat of water-based yellow aniline dye. The yellow will kill the cold purple-brown of this black walnut and give it a warmer orange tone very like English walnut. I put some of the hardware in place to check the fit but also to protect fragile edges of some mortices when I coated the stock with the water-based stain. You can see as it dried, it raised the grain, which I will scrape off. It also shows up some details that I want to go back and briefly work on. Finally, I leave the top edge of the barrel channel flat during this initial finishing and staining. I will feather it into the barrel when I scrape the stock again. I do that at the very end just before finish is applied because the edge becomes fragile and I don't want to dent or damage it during the finishing process so I leave it to almost the last task before applying finish.
auzCSwv.jpg

c0x5dZI.jpg

h7ER1v4.jpg

s8Wnf81.jpg

During this project, I did not fuss much about making sure details were even or finely made. I cut the details in the architecture with speed in mind as did the 18th century musket makers. For the most part, I substitute skill and knowledge for precision machinery and I find that strategy yields very authentic looking results. In that process, I try to honor the unsung heroes that were the humble tradesmen of the 18th century. In England, they kept the nation armed for protection and empire building, and the Bess was the greatest musket of them all.

dave
 
Hi,
Thank you all for looking and your interest. I really like this early pattern Bess. It weighs in at 9 lbs so it is pretty light compared with most long land Besses. After the yellow dried, I touched up the stock in places and then scraped off the whiskers. Then I painted it again with yellow dye and let it dry outside in the sun. Then I put on the first coat of finish which is Southerland-Welles wiping varnish, which was thinned with mineral spirits infused with red alkanet root.
SBo6sJR.jpg

I'll rub it back with a maroon Scotch Bright pad to smooth the finish and lighten the color a little. Then a few spare coats of unthinned S-W wiping varnish and it will be done. I want a slightly glossy varnish look to the finish.

dave
 
Hi,
Got more done on the Bess and other projects. My friends, Harley and Ernie surprised me today. They are retired Vermont farmers and avid, and really good, muzzleloader shooters. We sat on my shop porch, talked guns and looked at the view. Life is very good.
qSRpSqI.jpg

WKgFZ8K.jpg

I adjusted the trigger but I need to tune the lock to finish the job. With the big frizzen, massive flint, long throw, and strong springs, the lock should always fire no matter how dirty or dull the flint.
DIrp7Kn.jpg

Also, I wanted to show the screw that anchors the wrist plate. It goes through the wrist and anchors the trigger guard, rear of the trigger plate, and wrist plate.
3I3dvhC.jpg

I made and installed the nose band. This is an example of the historical details that make this stuff so much fun. The pattern 1730 musket was first issued with no nose cap or nose band. Very quickly, regimental armorers realized the potential for the stock to split and retrofitted nose bands. There were no recorded specs for the bands and it seems to have been left up to the individual armorers. Some bands had closed ends and many were left open, as I did on this one. I first file the stock to create the form for the band, then use card board to fit and create a template. I cut 0.04" thick brass to fit the template and anneal it. Then I bend it to fit the stock and pinch over the top edges to lock it in place. Finally, I drill the stock and band for a small flat headed brass wood screw, counter sink both sides of the hole and install the screw. I cut off most of the excess screw on the outside of the band and put the barrel in place to act as an anvil. Then I peen over the excess screw on the out side creating a very strong rivet. The nose band is neat and strong.
RLyVcEg.jpg

rYBckrn.jpg

I worked on final shaping the butt stock and defining the baluster wrist. The top of the comb swells a little and the wrist is defined by a sharp crease.
NAg3WAB.jpg

The front of the comb is blunt and fairly wid on these early Besses.
LpEsdOS.jpg


More later,

dave

What kind of chisel do you use to define the handrail of the comb? Gouge, verneer ?
 
Hi,
Got more done but I also wanted to highlight some details that may help those of you building or planning to build a Brown Bess. I thinned the fore stock more and installed the trigger. I have not adjusted it yet and that brings up the first topic. The Bess lock has no fly in the tumbler and a very light trigger pull may not be sufficient to keep the sear from catching in the half cock notch when the gun is fired. The original muskets had heavy trigger triggers but most modern shooters want something lighter. If the gun is used in reenactments, minimum trigger pull may be regulated often at 3 lbs. Currently, the pull on this musket is barely a pound because the trigger bar is lifting the sear. I have to file it down a little at a time to get it where I want it to be at about 2.5 o 3 lbs. At the current light pull, the lock hangs up at half cock when fired about 50% of the time. I've reworked many Pedersoli Besses that the owners had lightened the trigger pull and I usually find evidence of wear on the lip of the half cock notch because the sear is mashing it but not enough to slide into the notch. The bottom line, is there is a limit to how light trigger pull can be made on a lock with no fly detent in the tumbler. The photo below shows the lock and trigger, and how low the lock sits in the stock. There is not much wood below the edge of the lock and consequently, the trigger bar is not very high. The trigger is pinned about midway between "E" and "4" engraved on the lock.
lckvYKf.jpg

The sear of the lock is located left and below the engraved "2". So you can see that the trigger bar is pretty low relative to the lock but is pinned high giving good leverage. The flats around the lock in the photo will basically disappear when I am done. I will file that flat right up to the edge of the lock and then give the lock panel a swipe or 2 of sand paper backed by a flat block of wood to establish barely visible flats around the lock.
I thinned the forestock. The stocks on original Besses were not bulky. They were pretty trim and the early pattern was slimmest.
3TCiq01.jpg

9Xj1qOG.jpg

I believe some folks have trouble with the swell at the rear ramrod pipe. The first thing to understand is that the swell is horizontal, not vertical as well. There should be almost no perceptible swell downward when looking at the stock from the side.
wkjH0p4.jpg

On the early Besses, the swell was more ball like.
nXZIeHD.jpg

Later it became slimmer and more oval. Rear pipes on Besses had a little point of hook cast into their ends that hooked under the surface of the wood holding the rear of the pipe tang in place.
BSvqB3n.jpg

The early Besses had butt stocks that were much more bulbous that later patterns.
NhTFhAF.jpg

In addition, the comb swelled slightly wider at the top increasing the heavy appearance of the butt stock. Finally, the earliest patterns had attractive and wavy lock panel and barrel tang carving. On the bottom, the pattern faded away in the middle but on top it extended to connect with the barrel tang carving. The apron around the barrel tang had a concave contour.
mRe4D6n.jpg

Hi2g2Od.jpg


More to come.

dave

When cutting the butt plate tangle what’s your starting point ? Do you work forward or backwards ?
 
Hi Nick,
The answer to your questions with respect to the Brown Bess begins by understanding that a team of 10 Tower gunmakers turned a squared walnut blank into a musket stock ready for finish each day. They did not fuss but knew their stuff, really, really well. With respect to the butt plate, first true and flatten all of the edges that will contact the wood. Next, place the plate against the side of the stock in the correct position and trace the profile of the inner edge of the butt plate from heel to toe on the stock. Also trace the curved arc at the hell of the plate on the stock. Cut to that line with a bandsaw or bow saw. Cut down to the edge of the arc in the stock creating a shoulder.
Imn3h62.jpg

Then inlet a slot in the top of the comb for the lug on the butt plate tang. Don't worry that the inlet will become oversized as the plate is inlet. Then anneal the tang of the butt plate and bend it up and out of the way at its end. The problem in the little ball at the end, which once inlet cannot be moved forward to fit the rest of the plate. You have to get it out of the way, fit the rest of the butt plate, which may involve moving the tang forward and then bend it down and inlet it at last.
With respect to the baluster wrist, refer to my thread on reworking a Pedersoli Bess that I posted here.

Good luck.

dave
 
Thanks Dave for the tutorial ! Very appreciated.

Right now I’m practicing my tail pipes on cuts of dowel wood, the back and then down cutting is complicated, I’m using a 2mm straight chisel to keep it safe.
 
I try to honor the unsung heroes that were the humble tradesmen of the 18th century
Bravo for you. As with all your work, looking at that Bess generates drool here. Your knowledge and attention to historical detail is incredible. And, yes, that stock drop certainly is preferable to what is on the Navy Arms/Pedersolis versions.
 
Thanks for looking and commenting folks,
When I began inletting the lock, I used photos from Eric Goldstein and Stuart Mowbray's book on Brown Besses and my notes taken during restoration of some originals. I inlet the lock exactly like the photos in Goldstein's book and the lock, built from TRS parts, dropped right in with a little scraping to clear the mainspring. So removing the lock on this Bess will show how they were originally inlet. The photos below show the mortice.
GQAwwbR.jpg

LFLKanT.jpg

L0noif2.jpg

gzY2pvu.jpg


dave
 
Hi,
The lock is finished. I case hardened the plate, cock, top jaw, and frizzen, polished all the surfaces and tuned the springs. Before hardening, I had to re-engrave the crown and border lines because they were mostly wiped out during polishing. The lock is a beauty and functions very well.
erdXK5i.jpg

NlKNJEs.jpg

Bhaetck.jpg

Ddher6R.jpg

Notice how all the internals are crisp and sharp with temper blue colors showing on the sear and tumbler. That is how a pristine original would look. Below are some spark tests with a well used and dull flint. This baby won't fail.
ZtvSyIT.jpg

zUhJ5ae.jpg

Btinz9J.jpg


dave
 
Beautiful work Dave as always! I just looked in my old TRS catalogue (which is falling apart) and noticed that the 1742 Long Land Pattern (no.542B) locks' engraving looks fairly shallow in the photo. Yours came out great - after freshening the lines. Looking forward to the grand finale.
Mike
 
Hi,
Done! Ready for service. It represents one of the upgraded pattern 1730s that likely was commonly used in North America before and during the French and Indian War. The other common workhorse was the pattern 1742. The early pattern Besses are the best shooters because they were lighter and had more drop in the stock. It weighs 9.5 lbs, has a 46" 75 caliber barrel, TRS parts including the lock, which I built, sheet brass nose band, and hand forged sling swivels. The ramrod is ash and the stock is black walnut stained to look like English walnut. The musket was finished with files and scrapers and I worked fast. I left tool marks and chatter marks from the scrapers as existed on the originals. It is humbling to know that a team of 10 skilled ordnance tradesmen would assemble a complete musket from a rough stock blank and have it ready for finish in one work day.
fAPYGg8.jpg

58A3Wpr.jpg

JgsTGJr.jpg

toPazdN.jpg

jZIXI0R.jpg

TyOLtrW.jpg

fXOgsOx.jpg

WHmi6zd.jpg

KlGxDao.jpg

IBJFSto.jpg

pBd85FK.jpg

WEqE6xS.jpg

rhRFeuL.jpg


Finally, a bevy of British military beauties all built this year.
QjcwuwX.jpg


dave
 

Latest posts

Back
Top