• This community needs YOUR help today. We rely 100% on Supporting Memberships to fund our efforts. With the ever increasing fees of everything, we need help. We need more Supporting Members, today. Please invest back into this community. I will ship a few decals too in addition to all the account perks you get.


    Sign up here: https://www.muzzleloadingforum.com/account/upgrades
  • Friends, our 2nd Amendment rights are always under attack and the NRA has been a constant for decades in helping fight that fight.

    We have partnered with the NRA to offer you a discount on membership and Muzzleloading Forum gets a small percentage too of each membership, so you are supporting both the NRA and us.

    Use this link to sign up please; https://membership.nra.org/recruiters/join/XR045103

Dickert progress report....

Muzzleloading Forum

Help Support Muzzleloading Forum:

This site may earn a commission from merchant affiliate links, including eBay, Amazon, and others.

captgary

40 Cal.
Joined
Dec 2, 2005
Messages
180
Reaction score
2
Well, finally got the nerve to take some pic's of the Dickert rifle the wife bought me for my birthday. This kit turned out to be a lot tougher build than I thought it would be. Made mistakes on a hourly basis and learned a lot about fixing mistakes..... :cursing: Still have a lot of details to take care of, but at least it is starting to look like a rifle..... Whats your opinion :winking:does it look something like a Dickert????
100_0494.jpg
[/img]
100_0495.jpg
[/img]
100_0497.jpg
[/img]
100_0499.jpg
[/img]
100_0500.jpg
[/img]
100_0501.jpg
[/img]
 
Looks like your getting there! :)
The front of the comb is still needing a lot of wood removed though.

Looking down from the top, that area should be forming a triangle tapering from the front of the buttplate at the rear to a thickness of about 1/4 at the front. This front area would be a 1/8 inch radius.

As you develop this triangular area, obviously some wood has to come off of the sides. Leaving the outer verticle area of the cheek piece pretty much where it is, the area above it will be somewhat concave as you move into the more verticle sidewalls of the side of the comb.
I probably lost everyone trying to describe it but if you have access to "RIFLES OF COLONIAL AMERICA" vol I by George Shumway, on pages 280-291 you will see what I'm trying to describe.

Keep up the good work!! :grin:

PS: This picture isn't a Dickert and it isn't at the best angle to show it but notice how the comb tapers in towards the front and how the cheekpiece is somewhat concave to accomodate the tapered comb.
Actually, the sides of this comb looking down from the top are somewhat curved. The Dickert rifles in Shumways book are more of a straight walled triangle. :
cangun3.jpg
 
My instructor at PCC Gunsmithing program was apt to say "It is not a mistake,if you can fix it!"Nice Work :) !Thanks for posting! :applause:
 
Coming right along nicely. Three items that would "slenderize" the stock would be to decrease the flat surrounding the lock to 1/8" and then transfer that shape to the sideplate side. Look at some pics of originals and also of current LRs made by professionals to see at what areas the flat surrounding the lock becomes wider than 1/8". Adding a forestock molding slims down the forestock. Also as mentioned previously, the comb when looking down at it, should be a triangle from the buttplate tang to the drop at the wrist, which I usually make at the most 1/8" wide. Keep plugging and you'll have a nice LR......Fred
 
You obviously have very good skills with tools. Take the time to study some originals and you'll see the suggestions the guys made are very good. Precarves are made to have some room to work different styles, and it's hard for the beginner to appreciate they need to be radical in the shaping- not just clean up the lines that are there.

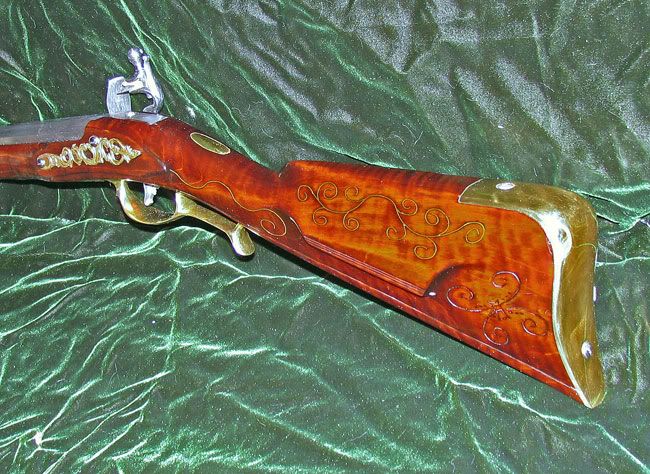
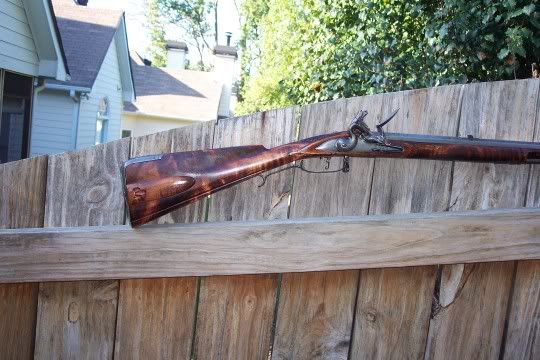
The lock panels and the comb need the most work. How to work the comb has been well covered.

The width of the lock panels has also been covered. Now you need to re-shape the front molding of the lock panel at the same time. It almost never is a simple half-circle on a longrifle. You'd do well to leave the molding extending that far forward, but radically re-shaping it. At the top edge of the molding, where it comes off the top edge of the stock, it must come off concave, not convex. You want a slim look, oval, egg-shaped like a robin's egg, long, for the front molding.

When you trim the width of the molding at the bottom, this will necessitate re-shaping the belly of the stock underneath. Make it nice and rounded.

You'd do well to radically reshape the top of the moldings. They give a chubby impression and the top of the stock at the tang is too flat. The top of the stock at the breech should slope markedly down to the lock and sideplate. This results in the top line of the molding on the sideplate side meeting the corner or angle of the barrel where the side flat and the angle flat meet.

You'd to well to trim the top line of the stock to show about 60% of the side flat of the barrel. This slims a gun. Show off the barrel- don't hide it down in the stock.

These sorts of tendencies, to leave too much wood, and not know how to shape these areas, are common to all of us starting out. I could show you some pictures of my first gun that perfectly duplicate the way you've shaped this first one.
 
In addition to what has been already said, and it's scarey the first ten or twelve times is to remove more wood along the barrel/ramrod channel. It is generrally less than 1/8th inch thick, and there should be a moulding running along beneath the barrel. Doing a great job, and its getting there. Heck, all I got from my wife for my birthday, was a 100lb. anvil, and 100lbs. of coal :rotf: Bill
 
Good constructive criticsism, knew I still had a long way to go, after reading your replies I went back and studied the books some more. Tonight I whittled the lock and side plate panel's to 1/4" and it looks 100% better already. Laid out the triangle for the comb and I must say it will be a little scarey taking off that much wood. will post more pics when we progress a little further. Again thanks for the help :bow:

Gary
 
You are doing a great job and obviously taking your time. You have gotten some great advice. The only thing I will add is that in addition to showing more barrel you want to show more ramrod as well. Showing slightly more than 1/2 the ramrod has a sliming effect as well. It also allows the wood of the upper forstock along the ramrod channel to flow around the ramrod pipes easier and with more graceful lines.
 
I agree: That forward end of the ramrod channel should flow into the end cap, and not take that abrupt curve as it currently does.
 
captgary: Thanks for your comment about the criticisms.

Last night I got to thinking,
"Here he shows off what he's done so far and many of us jumped all over his gun. I sure hope he has a tough hide!" :)

What you have done so far does show you are taking your time and doing a good job of it!
Keep up the effort and keep us up to date on how things are coming.

Zonie
 
Did some work on the panels and the comb, hopefully both are close to being somewhat correct. Your comments will be apreciated, Wife says its starting to look like a toothpick and if I whittle it down to nothing she wont buy me any more!!!! :rotf:

Zonie, I definatly got a thick skin, usually I dish it out pretty good so I learned real quick to take it :blah: :blah:

100_0507.jpg


100_0506.jpg
[/img]

100_0502.jpg
[/img]


100_0504.jpg
[/img]
 
Just tell her these Pennsylvania Rifles are works of graceful, flowing art.
Only the Military guns are supposed to look like war clubs or baseball bats. :grin:
 
Good job, now don't slow down! I'd take another third off those lock panels at the bottom and top. On the sideplate side, the panel edge should almost be at the top lock bolt head. Here's where the sideplate and lock panel top and bottom were on my current build a week ago. I'd not shaped the panels yet but was establishing the top and bottom. You'll see how close the top of the sideplate panel is to the top lock bolt.
RCA40shaping.jpg
 
How wide are the panels from the edge of the lock plate to the oouter edge of the panels. Just to my eye I think it will look better if you bring that down to 1/8 " wherever ithe outer edge is parallel to the lock plate..top and bottom.it will give you a much slimmer look from the sides. This will help you give an impression of long and slender which is howmany of the early guns I have seen look. On the side plate side I would think the top edge of the panel would be barely above the rear screw... anyway my $.02

keep up the good work!! I can't wait to see it finished!
 
Tims.jpg


Here is one I did. not necessarily the best you will see...but it gives the idea of long and slender lock panels.... looking at it now..I actually wish I had slenerized the butt end of the panel a little more.
 
Nice Jaeger, Rich. In addition to the other comments, I'd reduce the comb down to a point maybe 1/8" wide. While you're at it, hollow out the cheek piece a bit until your eye falls behind the sights.
HPIM0768.jpg
 
OK guys, now I got some good pics to look at,most of the books dont really show the comb area that good, and the lock area seems to be a big blur.
Thanks for the insight, will go back to sanding and filing somemore. :bow:

Gary
 
Using my calibrated eyeball (I was once a QA Engineer) I would say the width of the lock panal flat on the three Dickert rifles shown in ROC vary from 1/8 inch to 3/16 wide at the top and bottom of the lock. This is measured from the lock mortice to the edge of the surface.
Note: When I said vary, I was refering to different guns. The width on any one gun seems to be fairly uniform.

At the front of the lock the panal width varies from about 1/8 on one rifle, 1/4 on another and 3/8 on another.
In these last two rifles, the width rapidly deminishes to blend with the thinner top and bottom face widths.

At the rear of the locks, the width increases as the lines of the top and bottom converge on one another.

You might save the chips and your wife can make a compost out of them. Surely wood that cost that much would make great stuff for bedding plants. :grin:
 
Back
Top